
To send email from Automation Workshop using Microsoft 365, an OAuth 2.0 credential is required to securely authorize access to your mailbox. This tutorial guides you through setting up a Microsoft Entra application using the user consent flow (interactive login), which allows individual users to grant permissions for the app to send emails on their behalf.
Later, we will connect this application with Automation Workshop, enabling you to automate email tasks without storing passwords or relying on legacy authentication methods.
Keep your Automation Workshop up-to-date to enjoy seamless integration with Microsoft email services. Regular updates ensure you benefit from the latest compatibility improvements as Microsoft continues to evolve their diverse email server configurations. This helps maintain reliable connections even as Microsoft's infrastructure changes over time.
App…
When working with Microsoft Entra, creating what is referred to as an "application" does not mean building or deploying a software application in the traditional sense. Instead, it involves registering a set of identifiers and permissions that allow external systems—such as Automation Workshop—to securely interact with Microsoft services using OAuth 2.0 authentication.
This concept of an "app" is part of the OAuth framework, where an app represents a client identity used for authorization and consent purposes. It acts as a secure bridge between the automation platform and Microsoft 365 services like email, by providing the necessary credentials, secrets, and scopes.
In this tutorial, we will walk through the process of setting up an application with a user consent (OAuth delegated) flow, where the user will manually authorize the app to access their Microsoft 365 resources. This is especially useful when direct credential storage is not feasible or when user-level access is required.
If you are looking to set up a service that operates without user interaction—such as a background system or unattended automation—please refer to our other tutorial that explains how to configure a headless client credential flow designed for service-to-service communication.
New
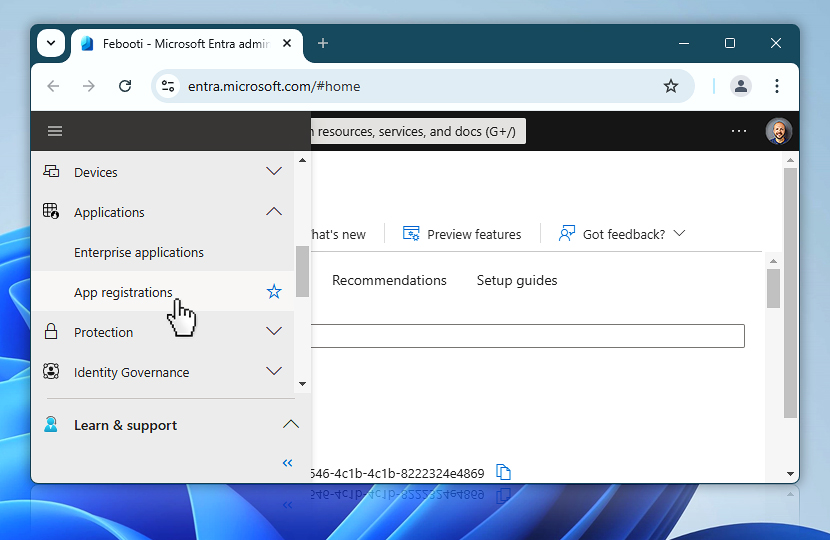
To begin the process of setting up an OAuth 2.0 application in Microsoft Entra. Open the Entra admin portal and in the navigation pane, expand Applications, then click on App registrations to continue. This is the starting point for defining the application that will be used for user consent authentication.
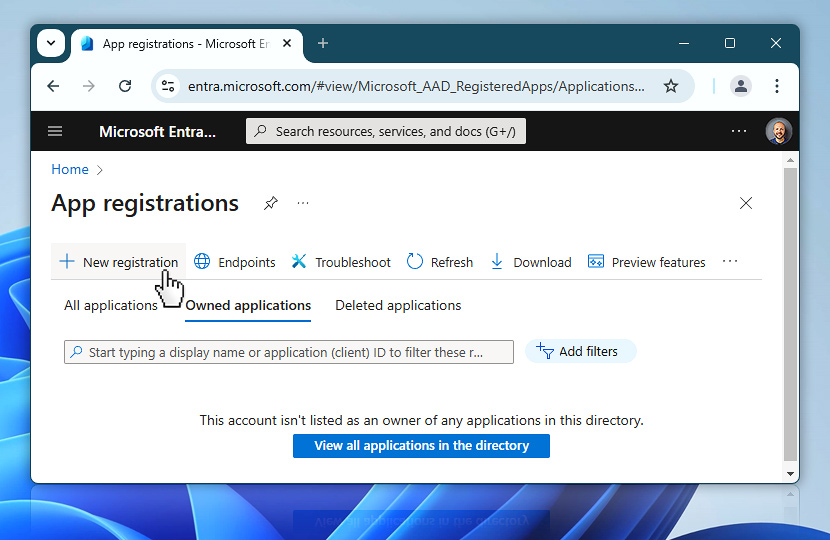
Once you are in the App registrations section, the next step is to create a new application that will represent your OAuth flow. Click the New registration button at the top of the screen to begin setting up a new app.
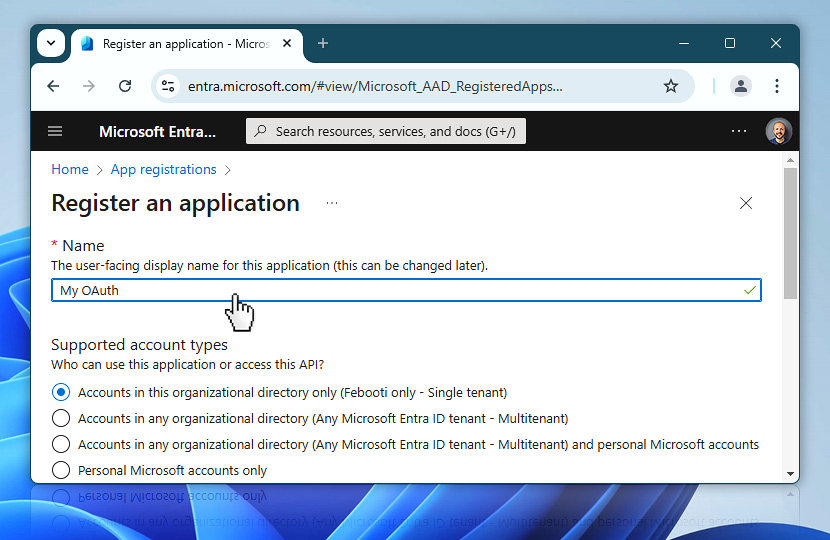
Now you will define the basic details of your new application. Begin by entering a descriptive name in the Name field—this name is for your internal reference and can be changed later if needed.
Below the name, you must choose which types of Microsoft accounts can access this application. For most internal organizational use cases, select the default option: Accounts in this organizational directory only. This setting limits access to users within your Microsoft Entra tenant, which is suitable when sending emails from within your own company environment.
Register
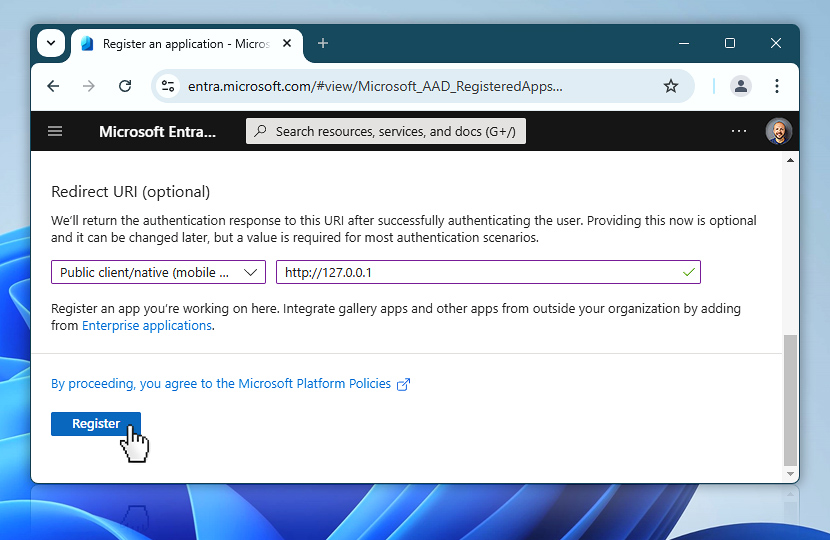
On the final screen of the application setup, you have the option to define a Redirect URI. For Automation Workshop, select Public client/native (mobile & desktop) from the dropdown, and enter http://127.0.0.1 in the URI field. This is a loopback address (data is not sent over the network) that will be used by Automation Workshop to receive the authentication response during the user consent flow.
When everything is filled in, click the Register button to finalize and create your new application.
Copy IDs
After registering the application, you are redirected to its overview page. Here you will find several important values, but for this tutorial we will need the Application (client) ID and Directory (tenant) ID. These two IDs uniquely identify your OAuth application and your Microsoft Entra tenant.
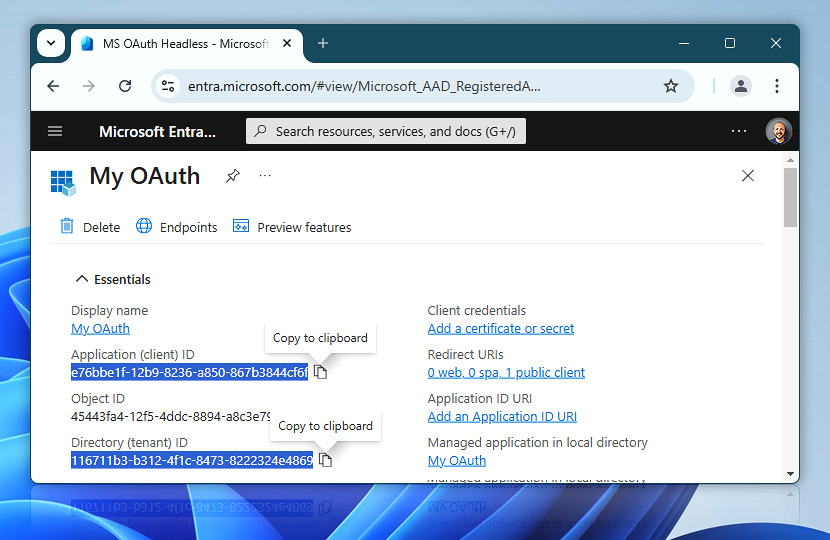
Click the copy icon next to each of these values to copy them to the clipboard. It is a good idea to paste them into a text editor like Notepad, because they will be needed later when configuring Automation Workshop.
OAuth credential…
Now that the required application is registered and the IDs are saved, switch to Automation Workshop. Open the API Keys & Credentials window from the Tools menu, and click on the New button to begin creating a new OAuth credential. This launches the Credential Wizard that will guide you through the process.
Create
In the first step of the Wizard, provide the email address that will be used to send messages via SMTP AUTH. Paste the Application (client) ID into the Client ID field.

Since this tutorial covers the user consent flow, leave the Unattended service account flow option unchecked. Click Next to continue with the setup. Automation Workshop will handle the authentication process using the interactive user flow in the next steps.
Flow
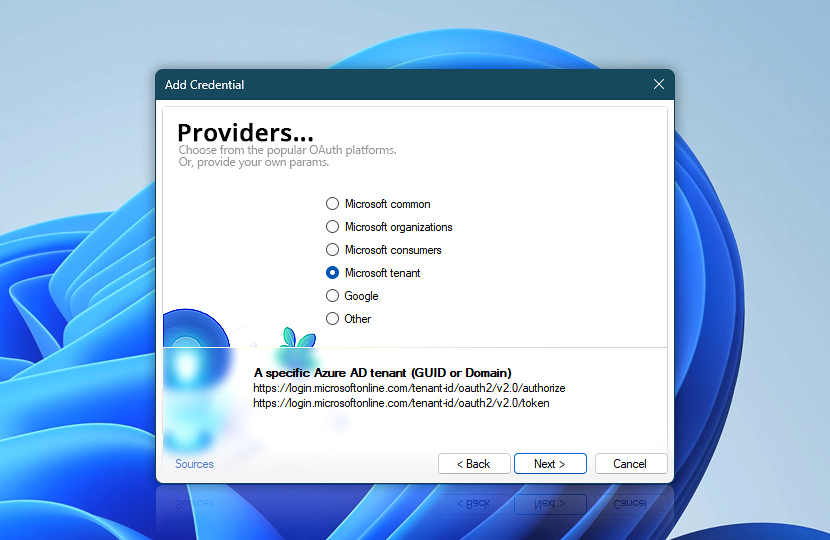
In this step, choose the standard Microsoft OAuth endpoints for tenant-specific authentication. From the list of available providers, select Microsoft tenant.
These endpoints are compatible with the application we registered earlier in Entra and are ideal when authentication is limited to users within your organization (single-tenant setup). Click Next to continue.
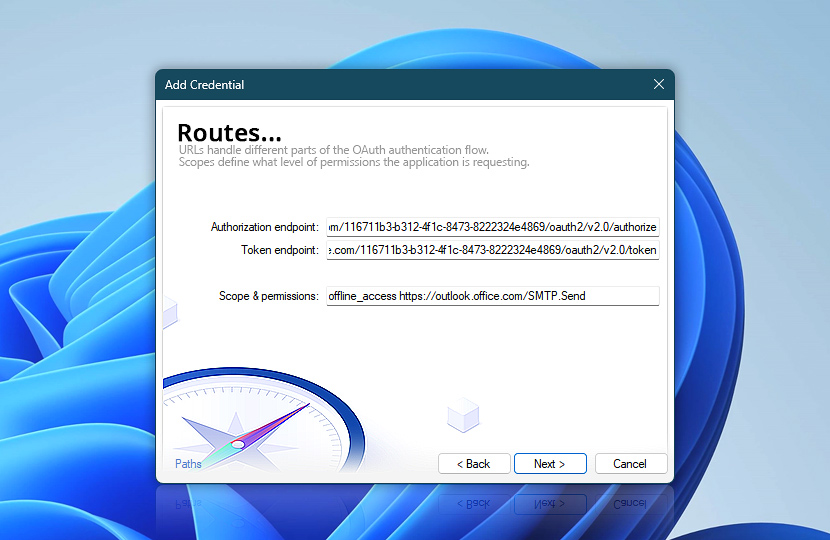
In this step, the Wizard displays default placeholder URLs for the authorization and token endpoints that include the tenant-id segment. To complete this part, replace it in both URLs with your actual Directory (tenant) ID that you copied earlier from the Entra portal. This substitution personalizes the endpoints for your specific Azure AD tenant.
Additionally, the scope is automatically populated with the necessary permissions, including offline_access and https://, which are essential for enabling persistent access and sending email via SMTP AUTH. Once the URLs are updated correctly, click Next to continue.
Auth
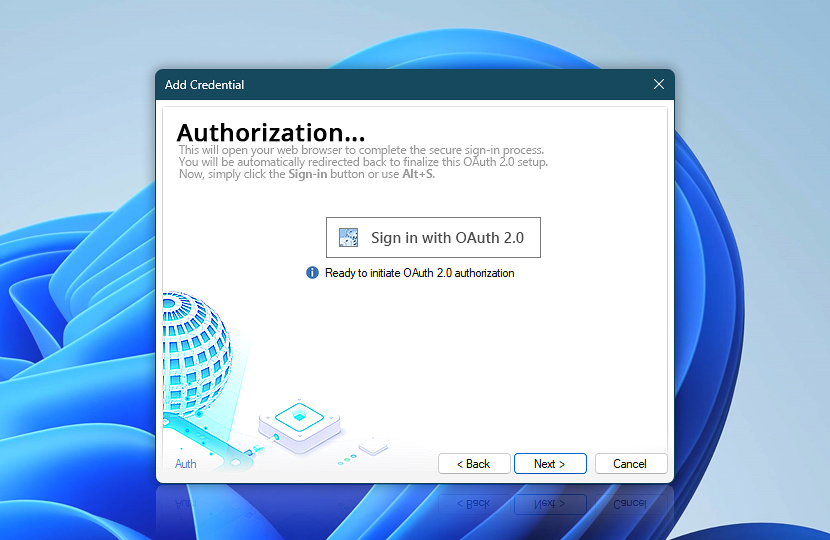
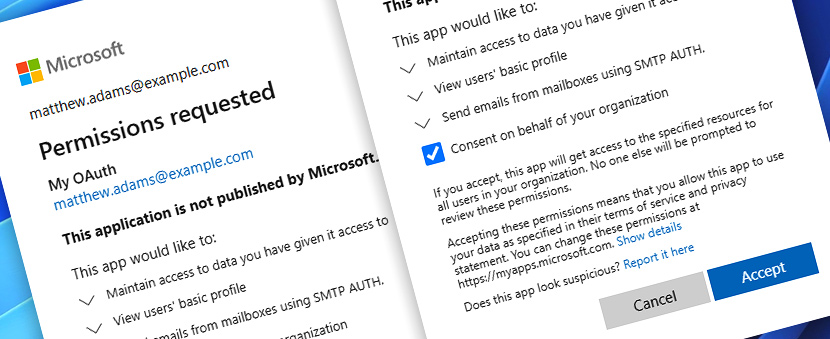
At this stage, the OAuth credential setup is ready to be finalized. To proceed, click the Sign in with OAuth 2.0 button. This will launch your system's default web browser and redirect you to Microsoft's secure sign-in page. There, you will be asked to enter your Microsoft 365 account credentials.
During the sign-in process, Microsoft may prompt you to review the requested permissions. Enable the Consent on behalf of your organization option and click Accept to complete the authorization step.
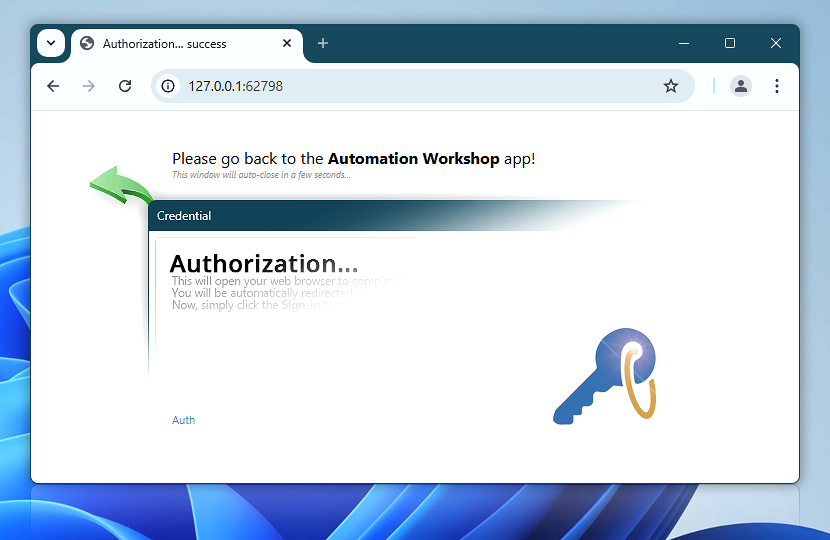
After successfully completing the authorization process, your web browser will display a confirmation message indicating that it is safe to return to the Automation Workshop application.
At this point, you can close the browser tab. This confirms that the OAuth token has been securely received, and you can now continue finalizing the credential setup in Automation Workshop.
Complete
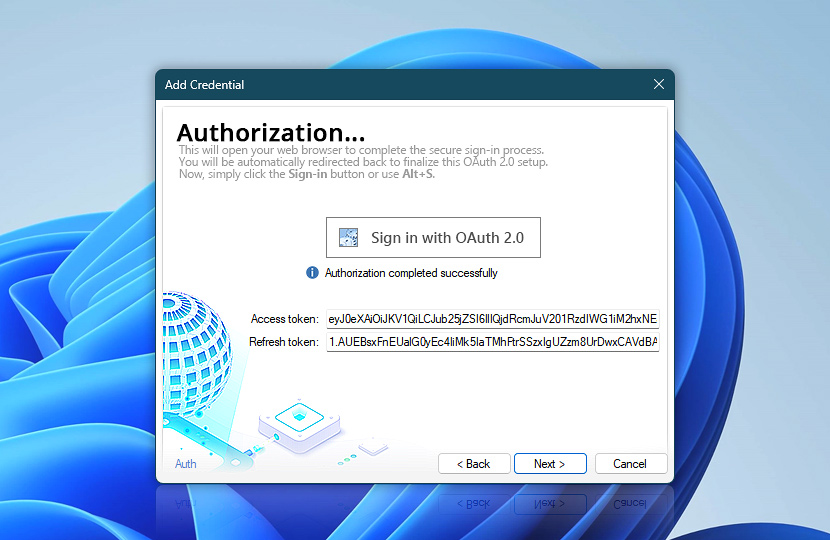
In this step, when you return to the Automation Workshop, you will see a confirmation that the authorization has completed successfully. Two tokens will be displayed—the access token and the refresh token. These tokens are securely stored and will be used by Automation Workshop to authenticate and send email messages on your behalf using Microsoft 365.
You do not need to copy or manage these tokens manually—Automation Workshop handles everything securely and automatically behind the scenes. Click Next to finalize and save the new credential.
In this final step of the OAuth credential setup Wizard, you can provide a recognizable name and an optional description for your newly created credential. This helps you quickly identify and differentiate credentials later, especially if you manage multiple accounts or configurations.
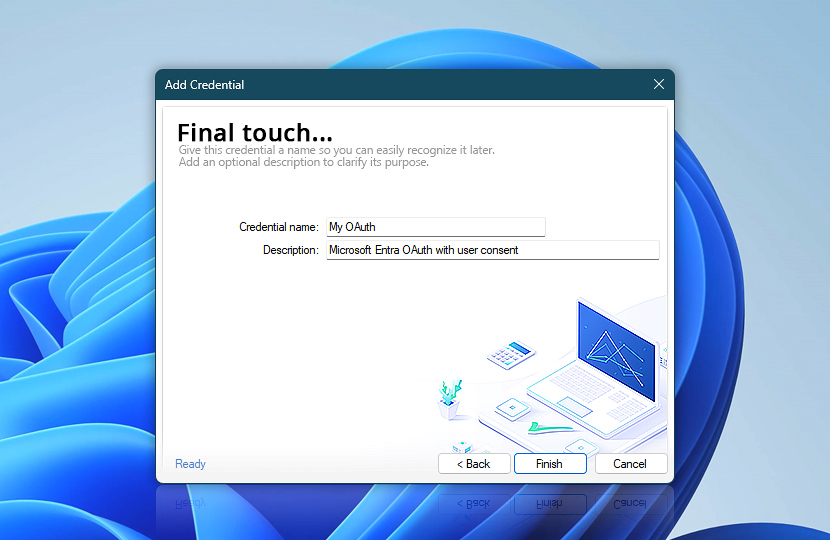
Once done, click Finish to save everything. Your Microsoft Entra OAuth credential is now ready to be used with Automation Workshop to send emails through Microsoft 365 using the user consent flow.
Configure email…
You can use the OAuth credential in the Options of Automation Workshop to configure a default set of parameters for sending email—such as the sender and recipient addresses and authentication settings. This approach is useful when you want a consistent setup across multiple email Actions, like for centralized system notifications or status reports.
Message setup
In this step, we have added a Send Email Action to the workflow and are configuring the basic email content. Enter the sender email address (the same one used during credential creation), the recipient address, subject, and the email body text. These values can be static or dynamically generated using variables from previous Actions.
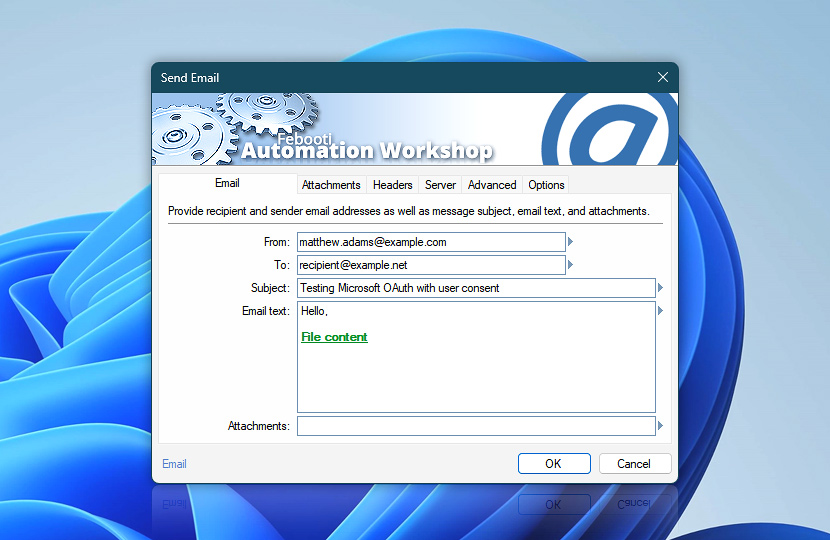
You may also attach files, include formatted text, or insert runtime values such as timestamps or other details. This flexibility allows you to create detailed and context-aware messages to suit a wide range of workflow automation scenarios.
SMTP & OAuth
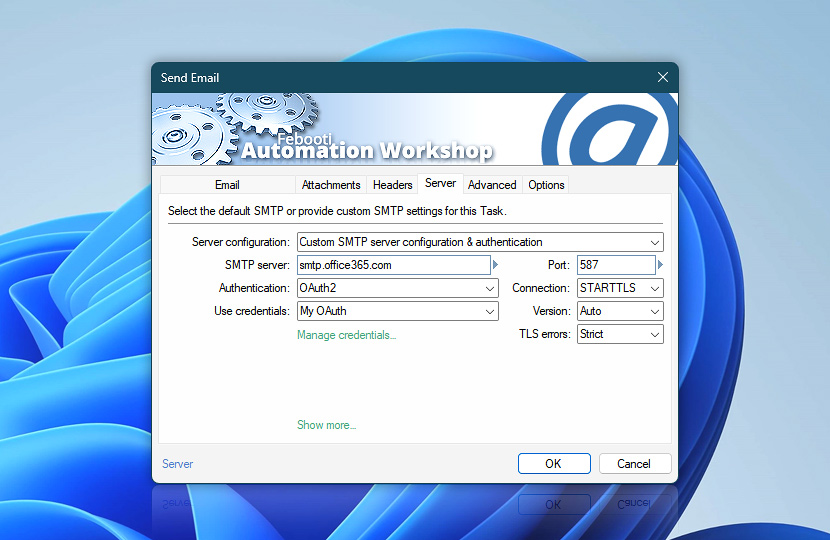
In this step, we move to the Server tab of the Send Email Action to finalize the configuration. Here, we specify how Automation Workshop should authenticate when sending the message via Microsoft 365.
Set the Server configuration to Custom SMTP server configuration & authentication, and enter smtp.office365.com as the SMTP server with port 587. Choose STARTTLS as the connection type to ensure secure communication.
For Authentication, select OAuth2, and in the Use credentials dropdown, choose the credential you just created using the Microsoft Entra user consent flow. This links your email-sending process to the authenticated Microsoft 365 user.
Once everything is set up, click OK to add the Action to your workflow. If you are using the Task Wizard, proceed with Next and then Finish to save the Task and make it ready for use.
Done!
You have completed all the necessary steps to configure Microsoft Entra with OAuth 2.0 using the user consent flow and connected it to Automation Workshop. Now it is time to test everything in action! Launch the Task where you added the Send Email Action to verify that your setup works. If everything is configured correctly, the email should be sent out immediately using your Microsoft 365 account.
Troubleshooting
After executing the Task, check the Log Pane to see the results. If the email was sent successfully, you will see a confirmation event in the log. However, if any errors or warnings appear, review them closely—these messages typically include details returned directly from Microsoft's SMTP server. Consult Microsoft's documentation for additional help understanding specific error codes.
For deeper diagnostics, you can also enable SMTP logging in Automation Workshop. This will provide full request and response communication between the application and the Microsoft 365 mail server, offering valuable insight for resolving more complex authentication or connectivity issues.
In corporate environments, it is not uncommon for outgoing connections to be restricted by firewalls, proxy servers, or advanced network security appliances, or even endpoint security software. These systems can block or interfere with SMTP traffic, preventing Automation Workshop from connecting to Microsoft 365 servers.
If you suspect such a networking issue, we recommend following our detailed SMTP connection troubleshooter that helps identify and resolve outbound connectivity problems with SMTP servers.
Still have a question?
If you have any questions, please do not hesitate to contact our support team.