
The initial step in configuring Automation Workshop for Microsoft OAuth email integration establishes the necessary authentication credentials. This foundational configuration must be completed before advancing to subsequent steps:
- Part 1 · Create Microsoft OAuth credentials · (you are here)
- Part 2 · Finalize Microsoft OAuth credentials using PowerShell
- Part 3 · Send first email using Microsoft OAuth credentials
Setting up OAuth credentials is essential to ensure secure authentication for sending emails through Automation Workshop.
Keep your Automation Workshop up-to-date to enjoy seamless integration with Microsoft email services. Regular updates ensure you benefit from the latest compatibility improvements as Microsoft continues to evolve their diverse email server configurations. This helps maintain reliable connections even as Microsoft's infrastructure changes over time.
App…
To begin, you must go to the Microsoft Entra admin center, where you will create an app registration for your organization. This process allows you to define how Automation Workshop can securely access Microsoft services—such as sending emails on your behalf—using modern, standards-based authentication.
You are not building a full application in the traditional sense. Instead, you are setting up a secure OAuth 2.0 integration. The app registration is simply a way to configure permissions, generate credentials, and define how Automation Workshop connects to Microsoft 365 using a headless flow—one that does not require a manual sign-in or user consent during runtime.
New
After signing in to the Microsoft Entra admin center, open the navigation menu on the left and go to Applications. Under it, you will find the App registrations section—this is where you will register your new app. Think of this step as creating a secure identity for Automation Workshop within your Microsoft 365 environment. You will use this app registration to define what the automation is allowed to do and how it will authenticate.
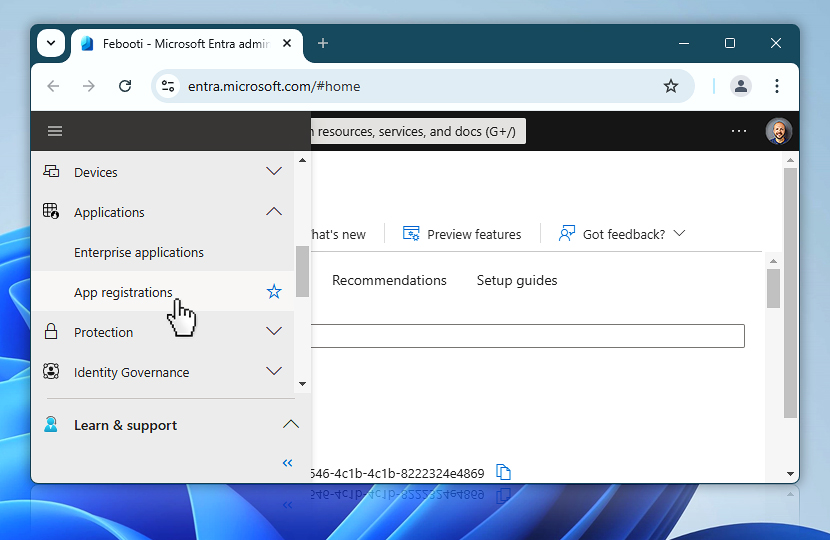
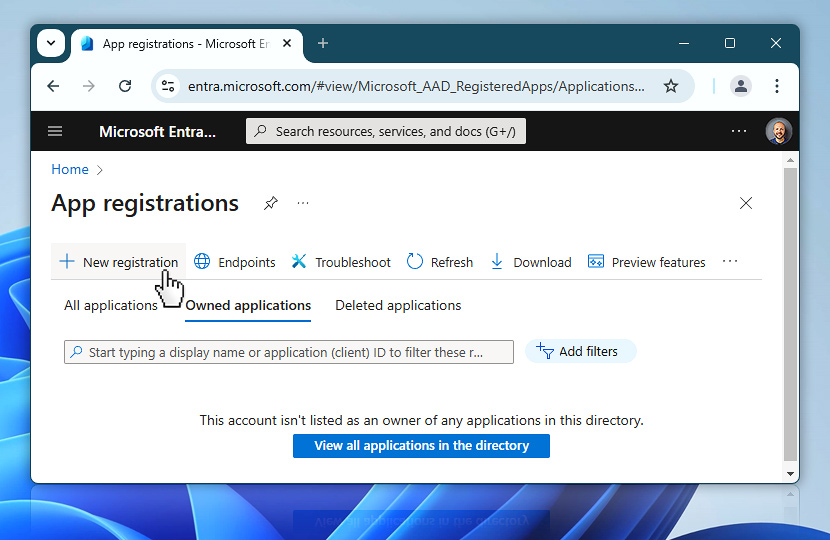
Once you are in the App registrations section, you can begin the process of registering your app. Start by selecting New registration at the top of the page. This will open a new form where you will define the name and basic configuration of the app that Automation Workshop will use.
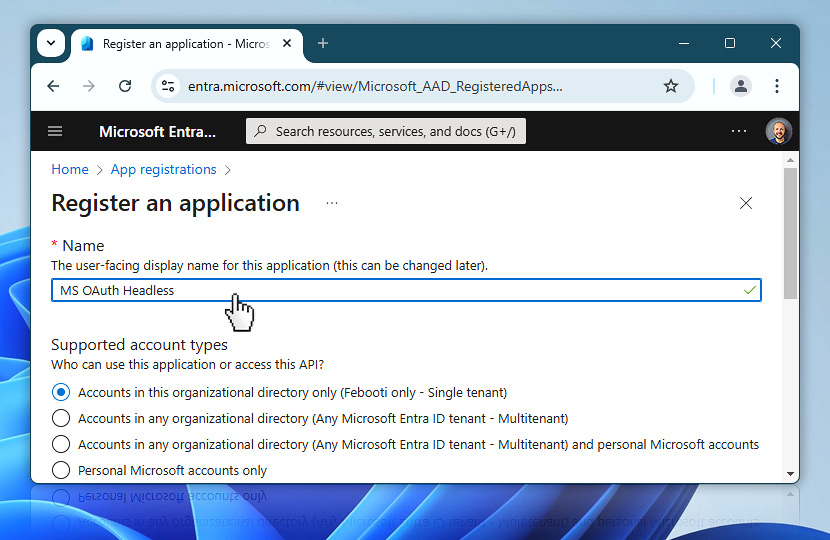
You are now at the Register an application form. Start by entering a name for your app—this is only for internal use, so choose something meaningful that helps you identify the purpose of the credential later. For example, MS OAuth Headless is a clear name that reflects the use of a non-interactive, service-level flow.
Next, under Supported account types, select Accounts in this organizational directory only (Single tenant). This ensures that the app is restricted to your own Microsoft 365 tenant, which is the most secure and appropriate choice for service integrations that are not intended for external users or multiple organizations.
Once this is set, you are ready to proceed with creating the app registration.
Register
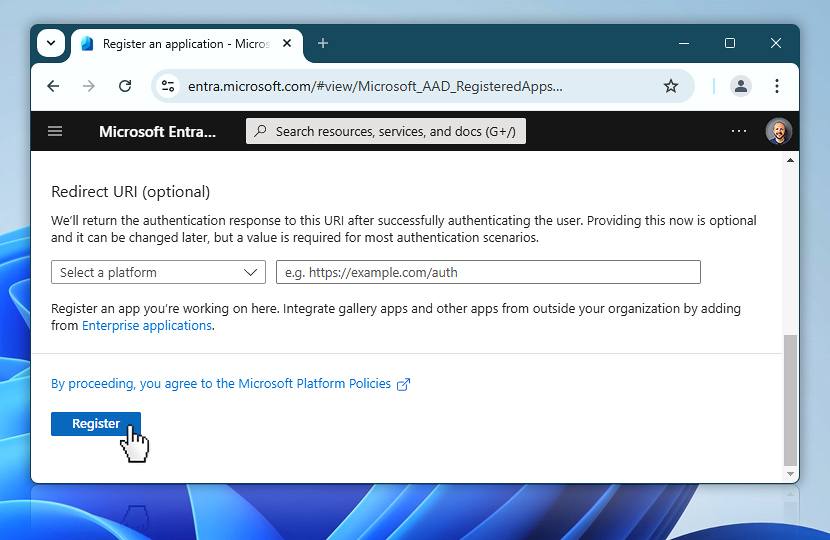
Before completing the registration, you will see the Redirect URI field. Since you are setting up a headless flow for background automation, this field can be left blank. Redirect URIs are typically used in interactive scenarios where a user signs in via browser, which does not apply to the type of OAuth flow you are creating here.
When everything is ready, proceed by selecting the Register button at the bottom.
After clicking Register, Microsoft Entra will create your app and take you to its overview page. From here, you will configure credentials, permissions, and endpoints—step by step—to prepare it for use in Automation Workshop.
Secret…
Now that your app is registered, you must create a client secret. This is a secure value that, along with the client ID, will be used by Automation Workshop to authenticate against Microsoft services. It works similarly to a password and must be kept safe.
The client secret is required in headless (unattended) flows where no user sign-in takes place during runtime. Without this secret, Automation Workshop will not be able to request or refresh access tokens.
Create
From the Overview page of your newly registered app, locate the Client credentials section and choose Add a certificate or secret. This opens the area where you can define the actual credentials that Automation Workshop will use.
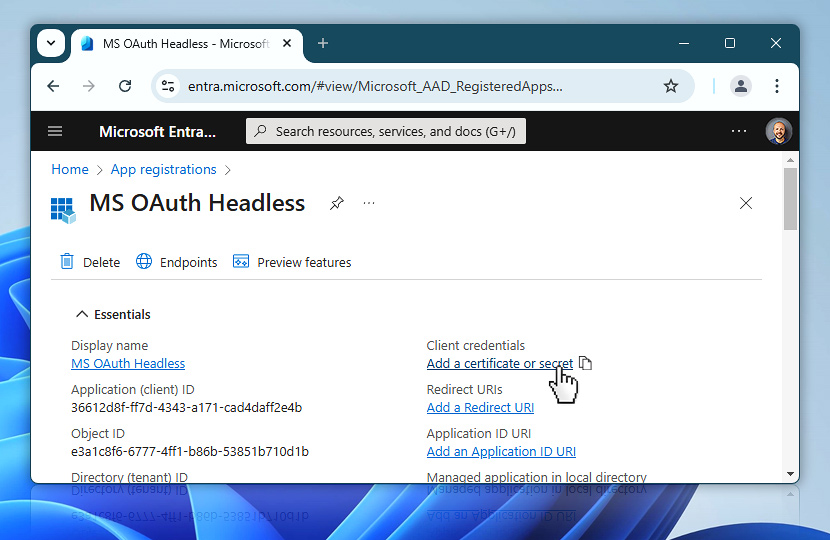
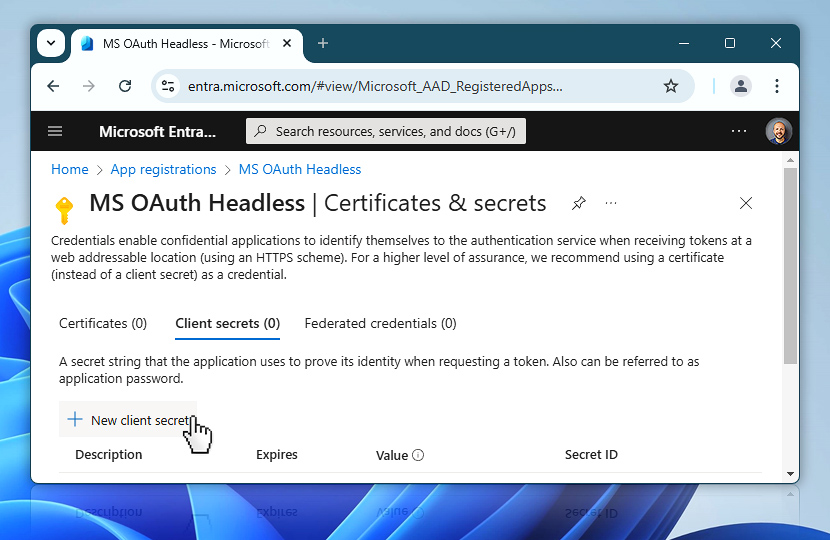
You are now in the Certificates & secrets section of your app registration. This is where you define and manage your client secrets—secure values used by Automation Workshop to prove its identity when requesting access tokens.
To continue, choose New client secret. This will open a short form where you will enter a description and set the expiration period. This value will act like a password for your app and must be used together with the client ID when requesting authentication.
Add
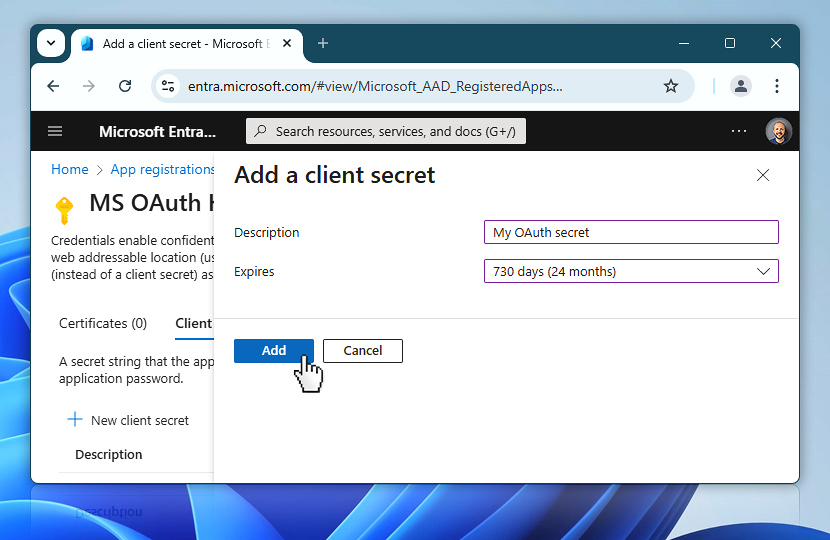
Now you will define the new client secret. Enter a short description that helps you identify its purpose, such as My OAuth secret or Automation Workshop service access. Then, choose an expiration period from the dropdown list.
The maximum allowed expiration is 24 months (730 days). Microsoft does not allow secrets with longer validity, so you will need to keep track of the expiration date.
When the secret is approaching expiration, simply return to this same page and create a new client secret. After generating the new value, update it in Automation Workshop under Credential properties. No other changes are necessary—your workflows will continue working seamlessly after the update.
Once everything is filled in, select Add to create the secret.
Copy/paste…
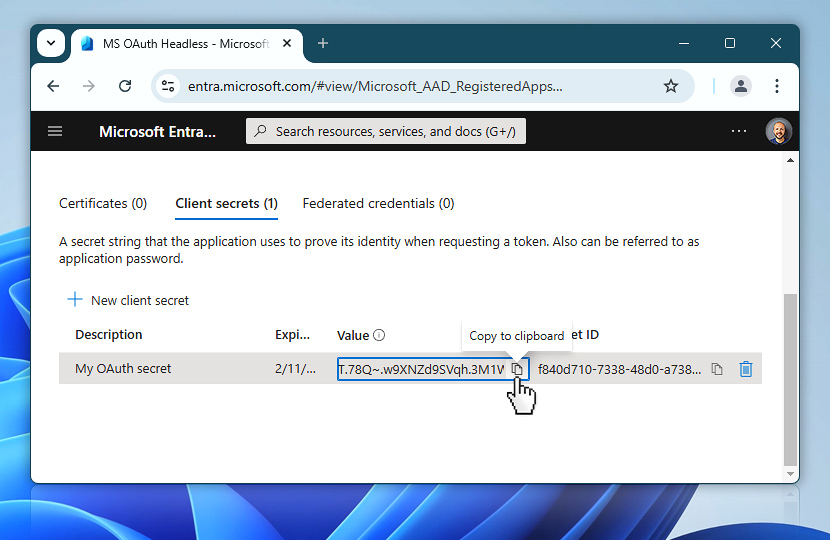
After creating the client secret, its value will be shown only once. This is your only opportunity to copy it—once you navigate away or refresh the page, the secret value will no longer be visible (but you can always create a new one when needed). It is crucial to store it securely.
At this stage, you will need to gather five essential values that will be used later in the tutorial when setting up Automation Workshop:
- Client secret
- Object ID
- Token endpoint
- Client ID
- Tenant ID
To make things easier, open your favorite text editor—such as Notepad—and start pasting each of these values there as you collect them throughout the steps.
Secret
Click the copy to clipboard icon next to the client secret and paste the value into your notes. This value will be used in Step 3 of the credential setup inside Automation Workshop.
If you miss copying it now, you will not be able to retrieve it later. In that case, you will need to return to the Certificates & secrets section and generate a new secret.
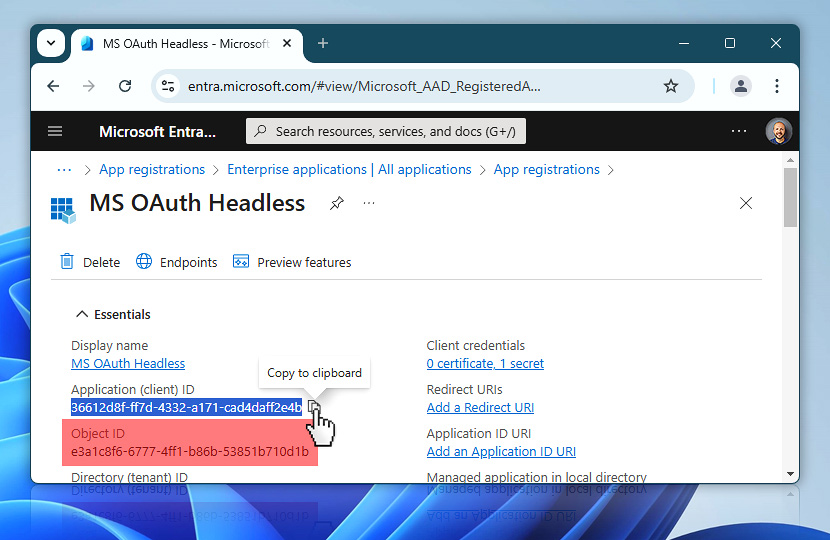
Object ID
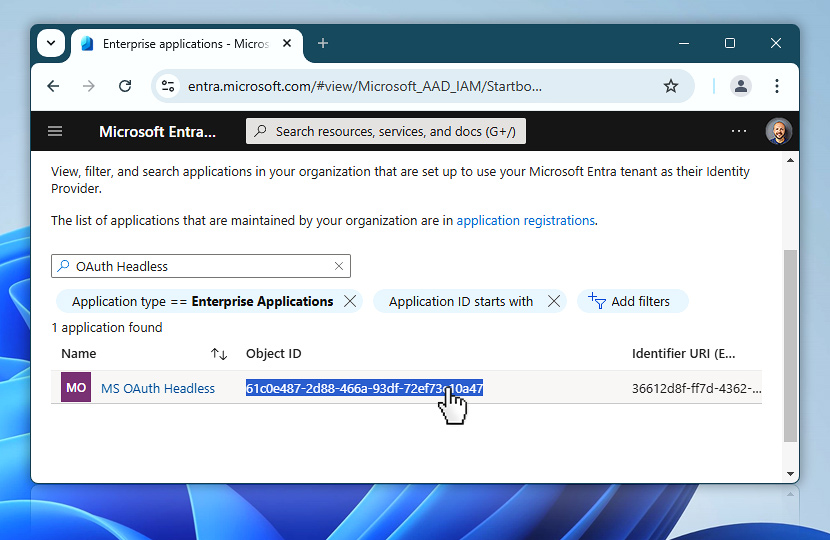
Now it is time to collect another key value: the Object ID. It is important to understand that Microsoft Entra displays two different Object IDs—one under App registrations, and another under Enterprise applications. For this setup, you need the Object ID from the Enterprise applications section. The other one will not work for token requests.
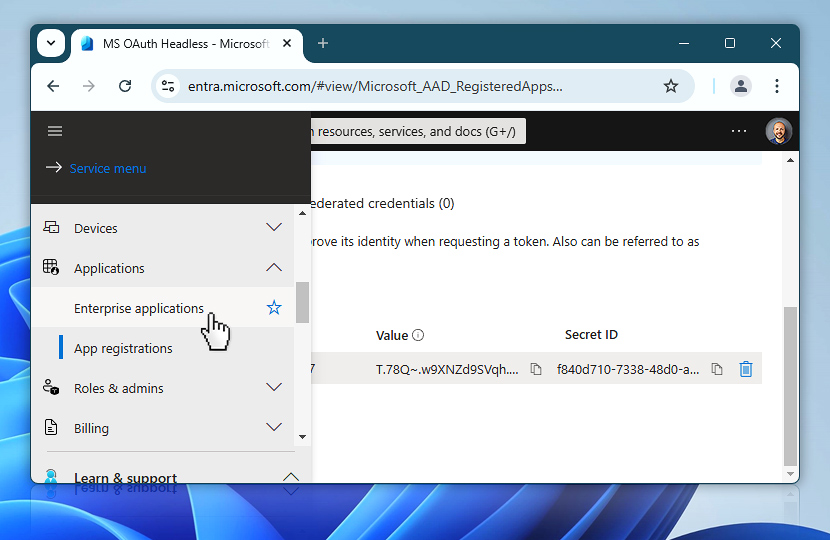
Once you are in the Enterprise applications section, locate your app in the list. If needed, use the search bar to quickly find it by name.
You will see a column labeled Object ID. This is the value you need—make sure not to confuse it with the one found under App registrations. Click the Object ID to highlight it, then copy it to your clipboard and paste it into your text editor alongside the other values you have been collecting.
This Object Id will be used later when configuring permission access (as ObjectID), so it is important to save it now.
Endpoint
Now that you have copied the Object ID from the Enterprise applications section, it is time to return to App registrations. This is where you will find the OAuth 2.0 endpoints, including the token URL you will need later when configuring Automation Workshop.
From the Microsoft Entra menu, go back to Applications and select App registrations once again.
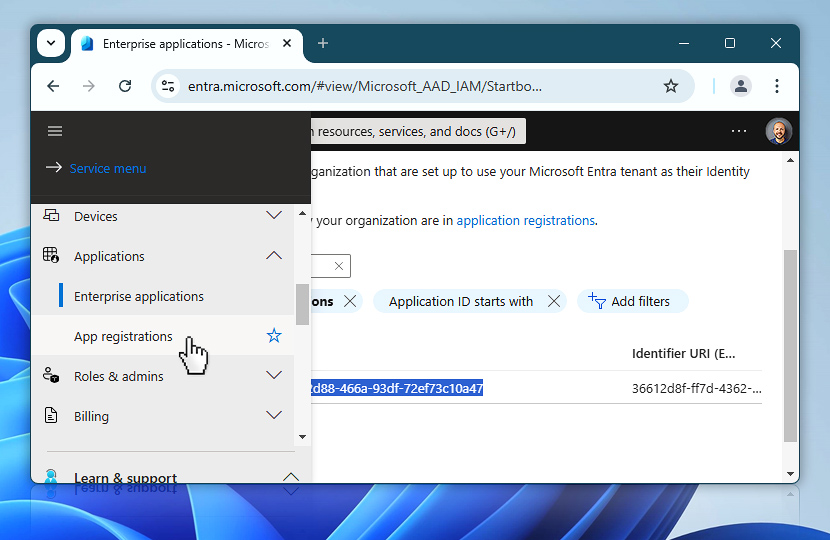
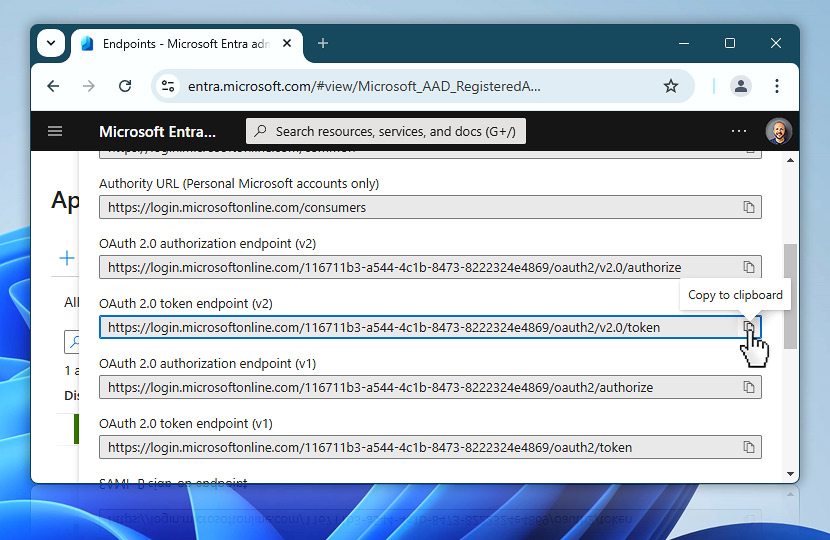
Once you are back in the App registrations section, select the Endpoints button.
This will open a list of URLs associated with your application—including the token endpoint, which is one of the five values you need to copy and save.
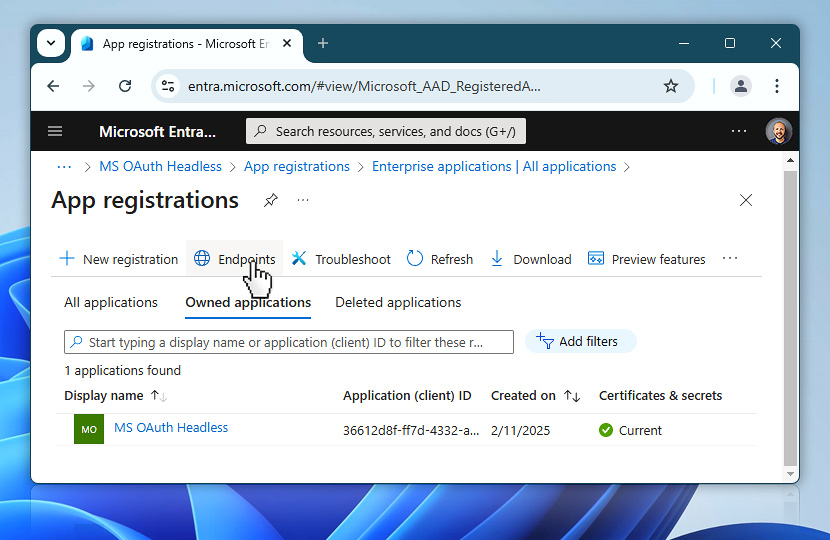
In the Endpoints sidebar, you will see a list of various URLs used by Microsoft's identity platform. For Automation Workshop, you only need one of them right now: the OAuth 2.0 token endpoint (v2).
Find this entry in the list and use the copy to clipboard icon next to it to copy the full URL. This token endpoint will be used later during the credential setup process to retrieve access tokens for your app.
Paste this value into your notes—alongside the other required values you have been collecting.
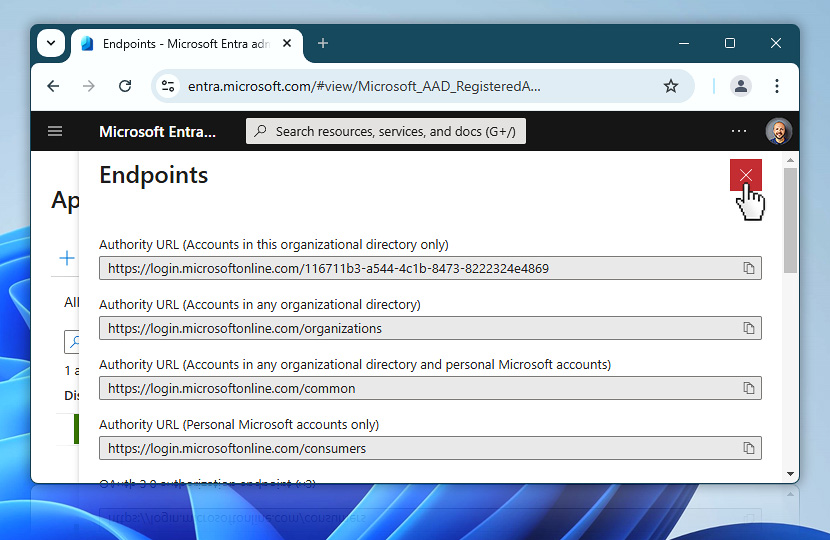
Once you have copied the OAuth 2.0 token endpoint (v2) and saved it to your notes, you are finished with the Endpoints sidebar.
You can now simply close the Endpoints popup by selecting the red X in the top right corner. This will return you to the App registrations view.
Application (client) ID
Next, you will collect the Application (client) ID, another one of the five values needed for the API credential setup in Automation Workshop. This value identifies your app when requesting access tokens from Microsoft's identity platform.
Find your MS OAuth Headless entry again under either the All applications or Owned applications tab. Once located, select the app name to return to the Overview page.

On the app overview page, locate the Application (client) ID under the Essentials section. Click the copy to clipboard icon next to it, and paste the value into your notes.
The Application (client) ID, also referred to as AppId or User in some places (like PowerShell), will be used during both the Principal creation and User assignment steps in later stages.
Tenant ID
The final value you need is the Directory (tenant) ID. This ID uniquely identifies your Microsoft 365 organization and is required when requesting tokens for service-level authentication.
In PowerShell scripts or API requests, this value is sometimes referred to as Organization—for example, when assigning roles or configuring app permissions via script. Regardless of terminology, this is the ID you will need to complete the setup.
On the app overview page, locate the field labeled Directory (tenant) ID just beneath the Object ID. Use the copy to clipboard button to copy it, then paste it into your text editor along with the other four values.
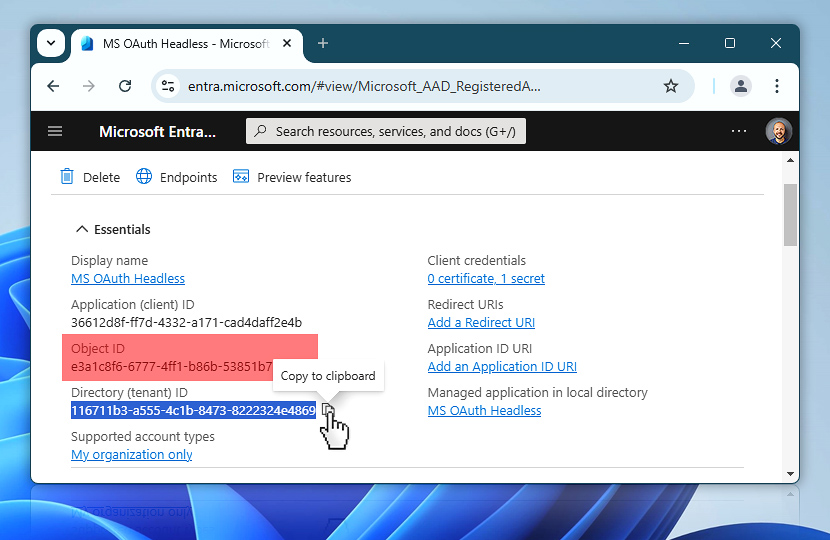
Side note: you will also see another Object ID just below the Application (client) ID. This is not the one you need. Microsoft labels this field identically, but it is different from the Enterprise application Object ID you copied earlier. Only that earlier one should be used in the setup.
With this, you now have everything you need:
- Client secret
- Object ID (from Enterprise applications)
- Token endpoint
- Client ID
- Directory (tenant) ID
These values will be used in the upcoming steps to configure Automation Workshop and establish secure, token-based communication with Microsoft services.
API permissions…
Now that you have gathered all required IDs and secrets, the next important step is to assign API permissions to your registered app. These permissions define what Microsoft 365 services your app is allowed to access, such as sending email, accessing mailboxes, or reading calendars.
Since you are using a headless, unattended flow, permissions must be configured at the application level and explicitly approved. This means you will not rely on a user's consent prompt—instead, you will manually assign and grant consent as an administrator.
Add
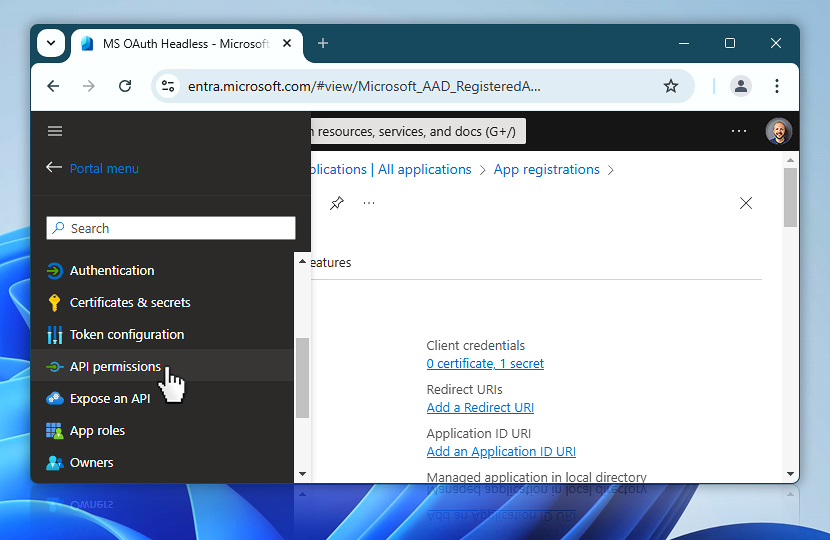
To begin, open the app's configuration panel and select API permissions from the left-hand menu. This section will allow you to add new permissions that match the scopes you plan to use in Automation Workshop.
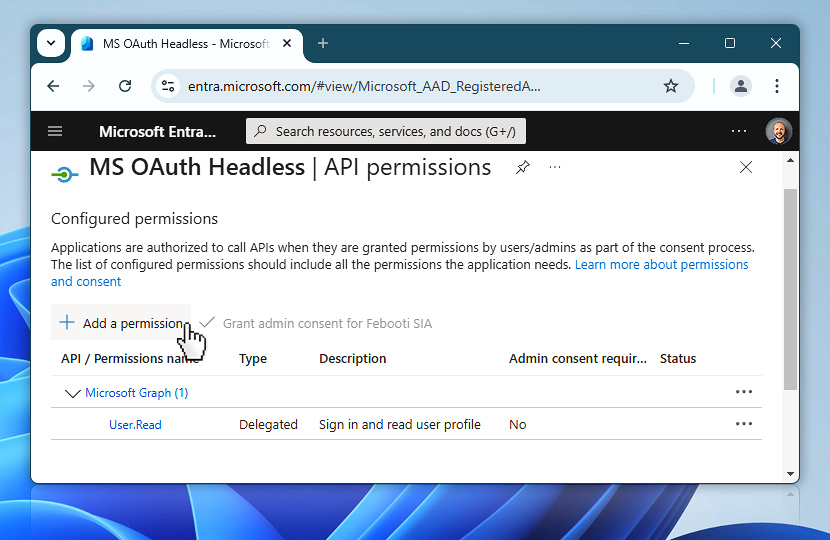
Now that you are inside the API permissions section, you will begin assigning the access your app will require when interacting with Microsoft services.
You may already see a default permission listed, such as User.Read under Microsoft Graph. This is typically a delegated permission and is not used in service-to-service flows. For Automation Workshop, you will add one or more application permissions depending on your use case—for example, sending emails via Microsoft 365. To continue, choose Add a permission.
Request
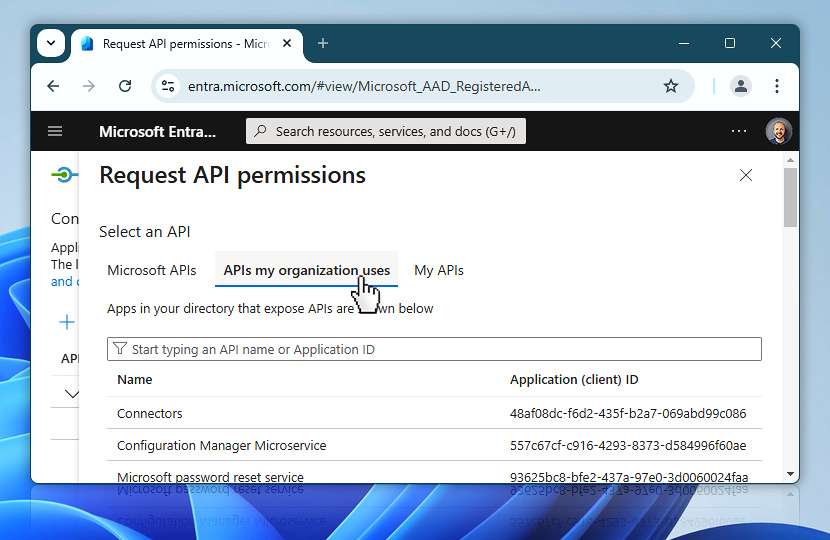
After selecting Add a permission, the Request API permissions window appears. This is where you choose the Microsoft API your app needs access to.
There are multiple tabs available. To keep things clean and focused, switch to the APIs my organization uses tab. This helps filter the view to services already known or approved within your Microsoft 365 tenant. It is especially useful if your organization has custom apps or commonly used APIs already set up.
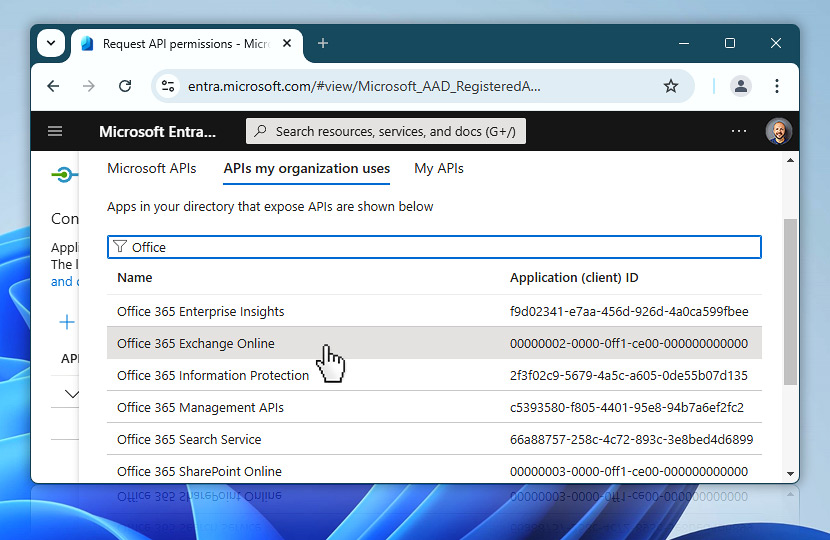
To locate the correct API more quickly, start typing Office in the search box. This filters the list to relevant Microsoft 365 services used in your tenant.
From the filtered results, select Office 365 Exchange Online. This API provides access to the Exchange mail services, including the ability to send emails via SMTP using OAuth 2.0, which is exactly what your Automation Workshop credential will be doing.
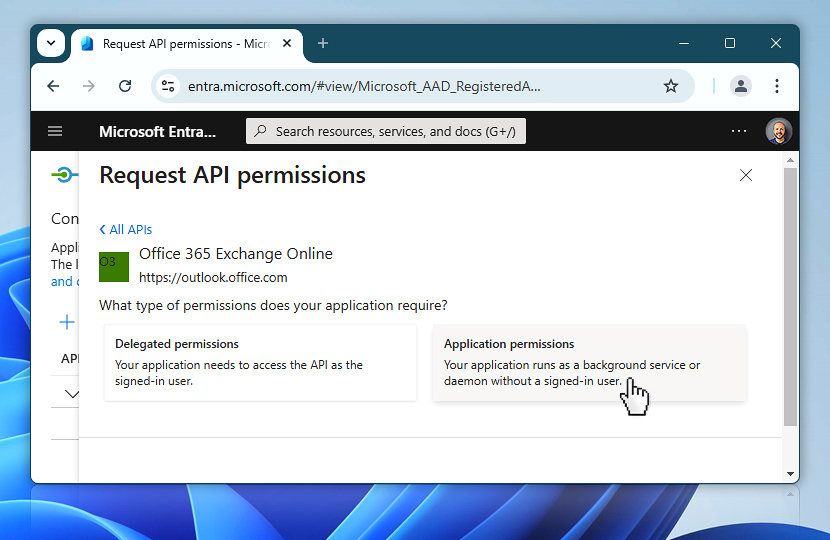
Now that you have selected Office 365 Exchange Online, you must choose the type of permission that matches your use case.
Since you are configuring Automation Workshop to run in headless mode (without a signed-in user), you must choose Application permissions. These permissions allow your app to operate as a background service or daemon, without requiring interactive user sign-in. Click on Application permissions to continue.
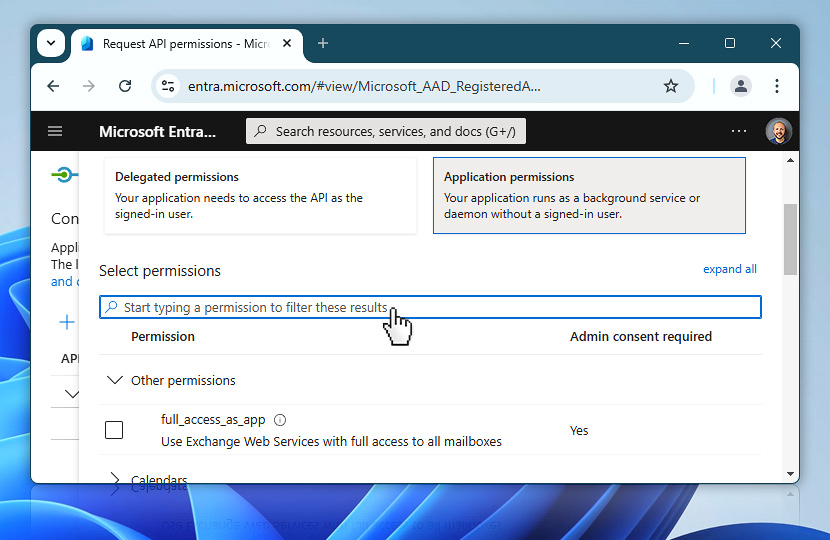
Once you have selected Application permissions, a full list of available permissions will appear. Instead of browsing manually, use the filter field to quickly locate what you need. Start by clicking inside the Start typing a permission input box.
This allows you to narrow the list based on keywords such as SMTP, Mail, or Send.
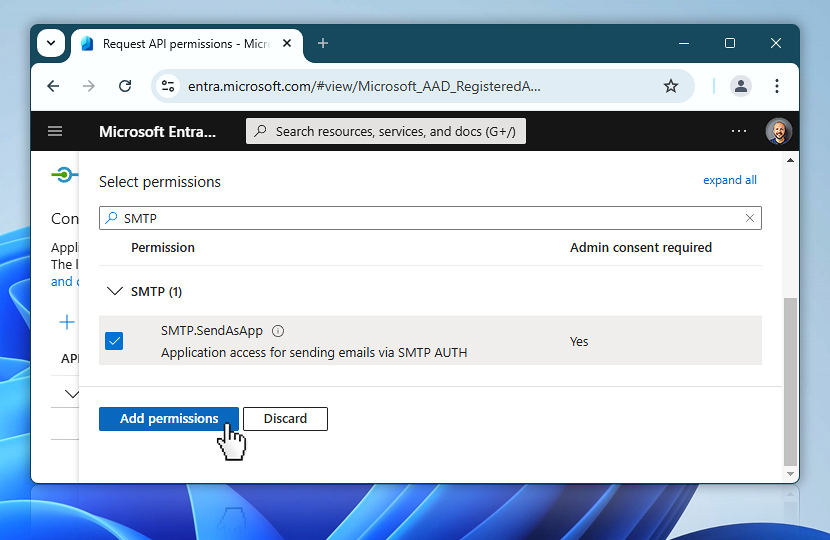
Type SMTP into the filter to find the permission that matches your requirement. In this case, choose SMTP.SendAsApp, which grants the application the ability to send emails using SMTP AUTH.
Make sure the checkbox is enabled and then confirm by selecting Add permissions. The permission will now be added to your app's configuration, but it is not active yet—the next step will be to grant admin consent.
Grant
Once the necessary permissions are listed, it's time to finalize the access setup by granting admin consent. This step confirms that your organization approves the application's use of the specified permissions. You'll see the Grant admin consent option appear above the list. Click it to proceed.
A dialog may appear asking: "Do you want to grant consent for the requested permissions for all accounts in [Company]?"—this applies the permissions across the tenant. Once confirmed, the permissions become active for the app.
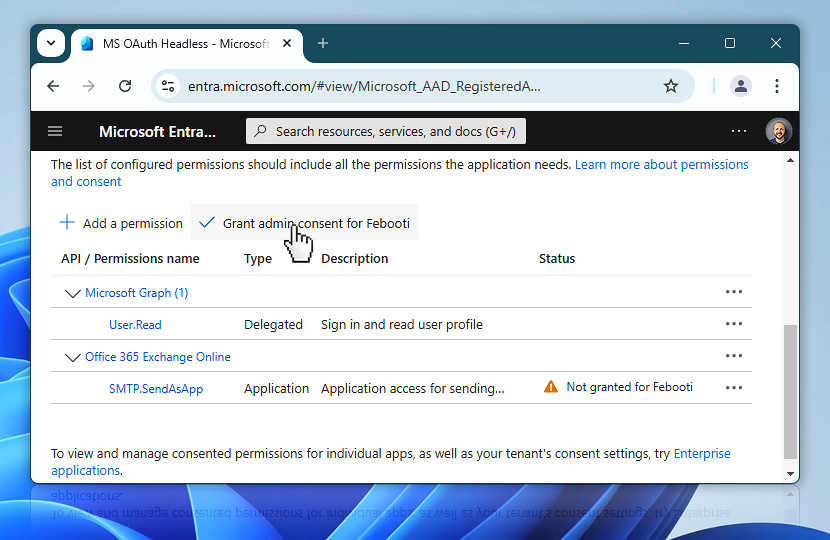
After the admin consent is granted, you should see confirmation directly in the Status column. Each permission now has a green checkmark and the label Granted for [your company]. This confirms that your OAuth app is now fully authorized to perform the tasks you've configured—such as sending emails via SMTP using the selected permissions.
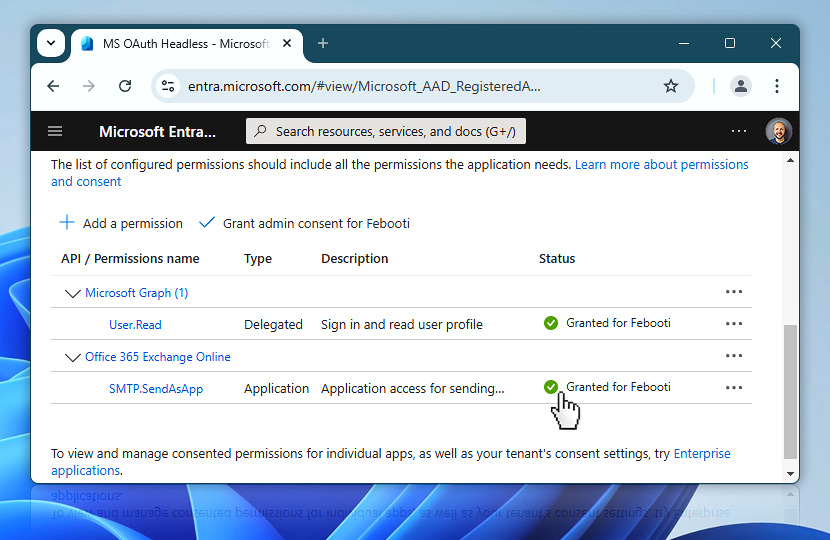
It's a good idea to double-check that each permission shows up as granted to avoid any authentication issues later in Automation Workshop.
Next steps…
You have successfully completed the initial setup of your Microsoft Entra application, including all the required OAuth configuration and admin consent steps. What comes next is preparing your Microsoft 365 tenant to actually use these credentials with Automation Workshop—this requires a few more steps outside the graphical interface.
PowerShell
Head over to Part 2 · Finalize Microsoft OAuth credentials using PowerShell where you'll assign the necessary mailbox access rights and register the service principal for SMTP access. These steps are critical for enabling unattended, background email operations—something not possible through the UI alone.
Once completed, your credentials will be fully functional and ready to authenticate mail operations across your organization's Microsoft 365 tenant.
Send first OAuth email
In the final part of the tutorial, you will return to Automation Workshop to configure your new OAuth 2.0 credentials and test them in action! You will paste in the IDs and secrets you have saved earlier, finalize the credential profile, and send your first fully authenticated email—no passwords or user interaction required.
Have a question?
If you have any questions, please do not hesitate to contact our support team.