
The final step in setting up Automation Workshop for Google OAuth 2.0 email integration is connecting your previously created credentials and sending a test email. This ensures everything is working correctly and ready for use in your automated workflows. Make sure you have completed the first part before continuing:
- Part 1 · Create Google OAuth credentials
- Part 2 · Send first email using Google OAuth credentials · (you are here)
Setting up OAuth credentials is essential to ensure secure authentication for sending emails through Automation Workshop. Adding your OAuth credentials to Automation Workshop allows the software to send emails securely without exposing your password. It also helps ensure long-term compatibility as Google evolves its authentication policies.
To keep everything running smoothly, we also recommend keeping your Automation Workshop up-to-date to benefit from the latest improvements and Gmail integration support.
OAuth credential…
To begin the integration process, open API Keys & Credentials in Automation Workshop using Tools menu. In the OAuth view, click the New credential button to start creating a new OAuth credential.
Create
In the credential Wizard, you can either fill in all fields manually or use the convenient Auto-fill from JSON file option.
Since we previously downloaded a JSON file from Google Cloud when creating our OAuth client, we will use it here. Simply click Auto-fill from JSON file and Automation Workshop will extract and automatically populate the following:
- Client ID
- Client secret
- Authorization endpoint
- Token endpoint
Please note that the email address must still be entered manually. This is the address that will be used for SMTP AUTH.
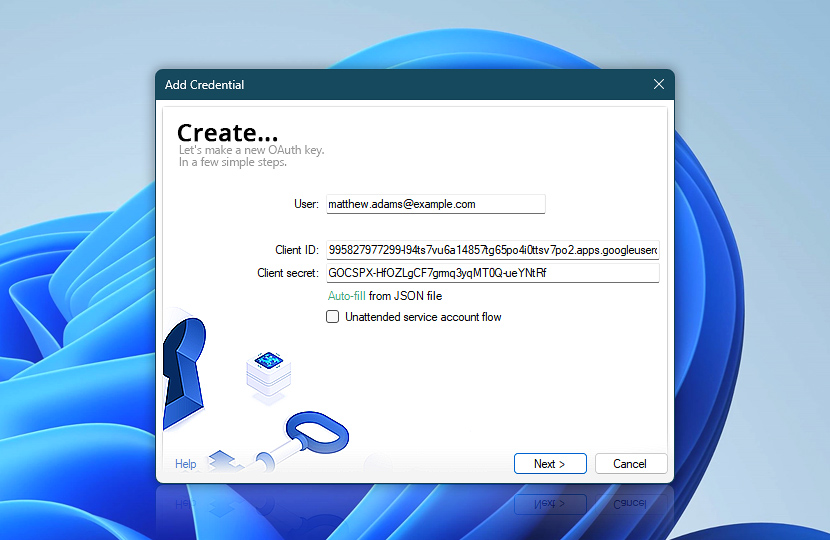
Using the JSON file not only saves time but helps avoid copy-paste mistakes in key fields like credentials and endpoints.
Flow
At this step, Automation Workshop analyzes the authorization and token endpoints from the JSON file. Since these match Google's standard OAuth 2.0 endpoints, the Wizard automatically selects Google as the provider.
This ensures compatibility with both Gmail and Google Workspace accounts and saves time by pre-filling the necessary OAuth service URLs.
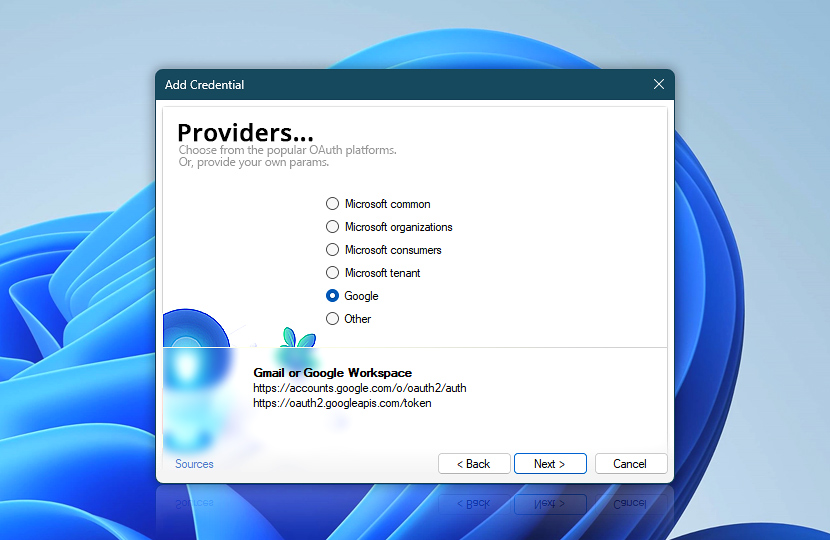
The Wizard now displays the authorization and token endpoints, which have been pre-filled from the JSON file and confirmed by the previously selected Google OAuth provider.
For the Scope & permissions, Automation Workshop uses the https:// scope. While the narrower gmail.send scope might seem sufficient for sending emails, due to a known limitation in Google Cloud's implementation, SMTP-based sending (used by Automation Workshop) requires the broader full Gmail access scope.

All necessary configuration values have been defined, and you are now ready to begin the secure OAuth sign-in process.
Click Sign in with Google to initiate the authorization flow. Your default web browser will open automatically, guiding you through the sign-in process using your Google or Google Workspace account.
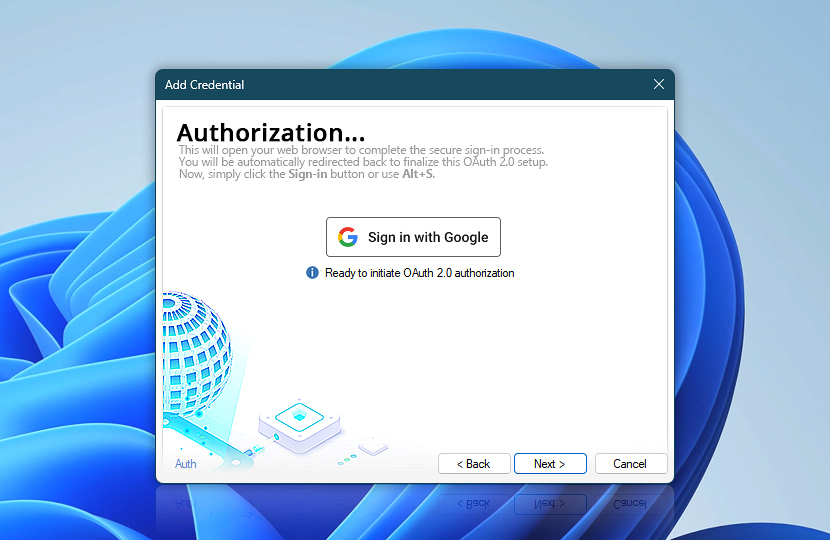
During the process, you will be asked to log in and grant the required permissions. These permissions allow Automation Workshop to send emails on your behalf using the Gmail SMTP service.
Sign in with Google
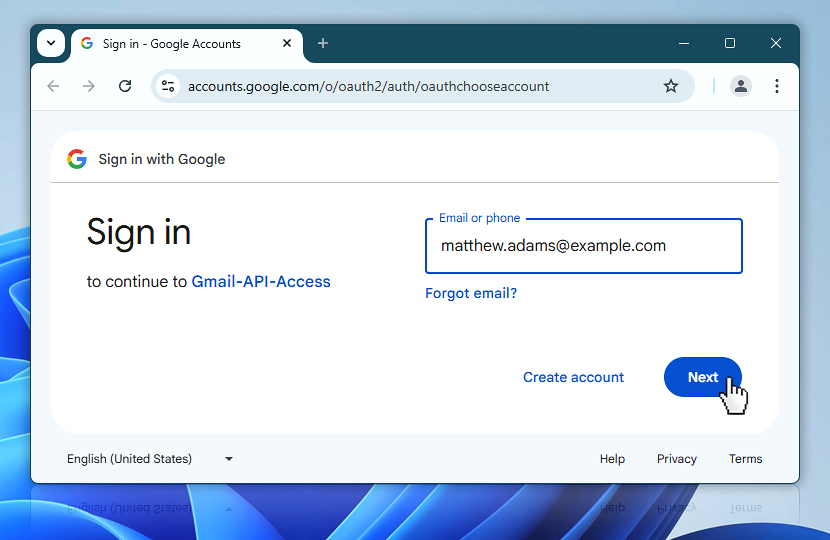
After clicking the Sign in with Google button in Automation Workshop, your default web browser launches to continue the OAuth authorization process. This step is handled entirely in the browser and is required to grant the necessary permissions for email sending.
Sign in
You will now be prompted to sign in to your Google account. Enter the email address you used when creating your OAuth credentials on the Google Cloud Console. This should be the same address you intend to use for sending emails.
Once the email is entered, click Next to proceed with password authentication and the following consent steps.
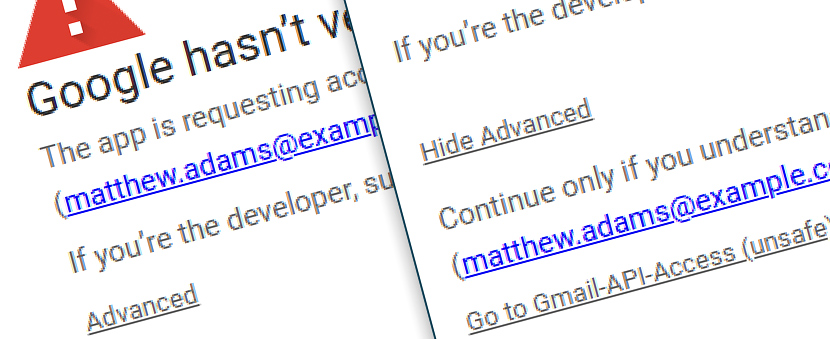
Non-Workspace acc?
If you are using a regular free Gmail account and have not gone through the full Google verification process (which most people do not), Google will throw up a big red warning screen. It will say things like This app is not verified or Only proceed if you trust the developer.
Here is the twist—you are the developer.
So if you trust yourself (and hopefully you do), go ahead and click that little Advanced link, then Go to [your app name] (unsafe) and proceed. It is totally safe—you are just granting permission to your own project that you created moments ago.
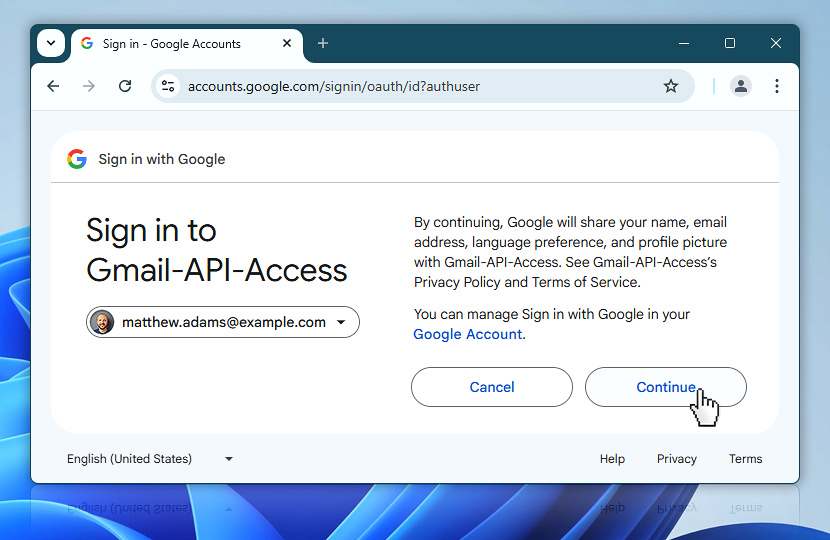
Grant access
After signing in, Google will show a confirmation screen asking whether you want to grant access to Gmail-API-Access—this is the same app you created earlier in the first part of this tutorial. To proceed, click Continue.
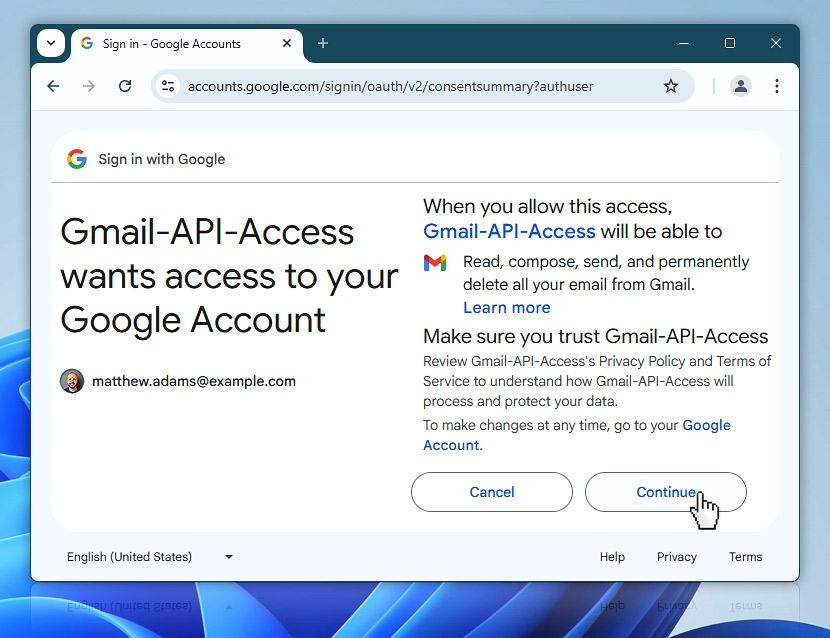
Although Automation Workshop only uses OAuth to send emails, you may notice the app is requesting full Gmail access: read, compose, send, and permanently delete emails. This is because, when setting up the OAuth scope, we specified the full Gmail scope https:// instead of just the more limited send scope.
The reason? A known limitation in Google Cloud currently prevents SMTP-based email sending from working correctly with only the send permission. To ensure compatibility, we must use the full Gmail scope—even if we do not intend to use the broader permissions.
Click Continue to authorize the app and complete the process.
Sign in done
Once you have granted the required permissions, Google redirects you to a confirmation screen in your web browser. This page confirms that the sign-in process has completed successfully.
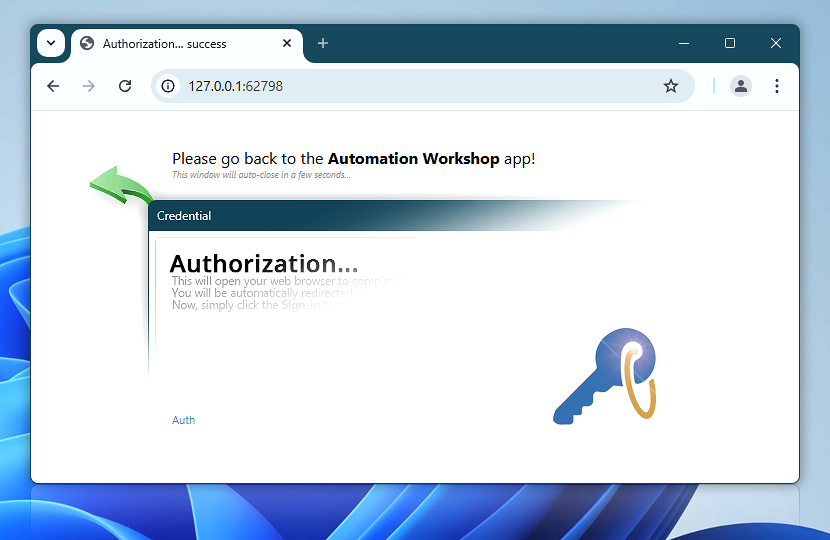
You will see a message prompting you to return to the Automation Workshop app. You can close it manually and return to Automation Workshop to continue.
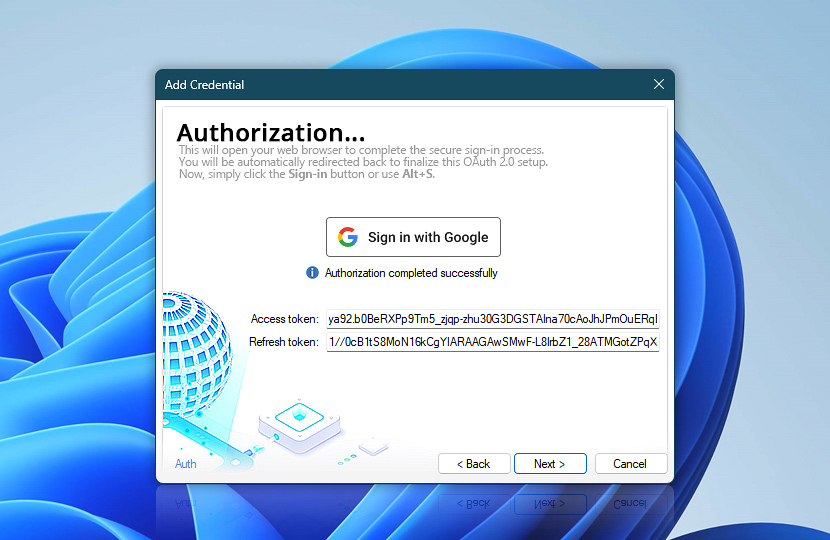
OAuth ready…
At this point, your OAuth 2.0 authentication process is nearly complete. Automation Workshop has successfully connected to Google's servers and received the necessary tokens to authorize future actions—sending emails on your behalf.
Review
You can now review the obtained tokens. The Access token allows Automation Workshop to access the Gmail service for a limited time, while the Refresh token ensures continued access by generating new access tokens automatically. Click Next to continue.
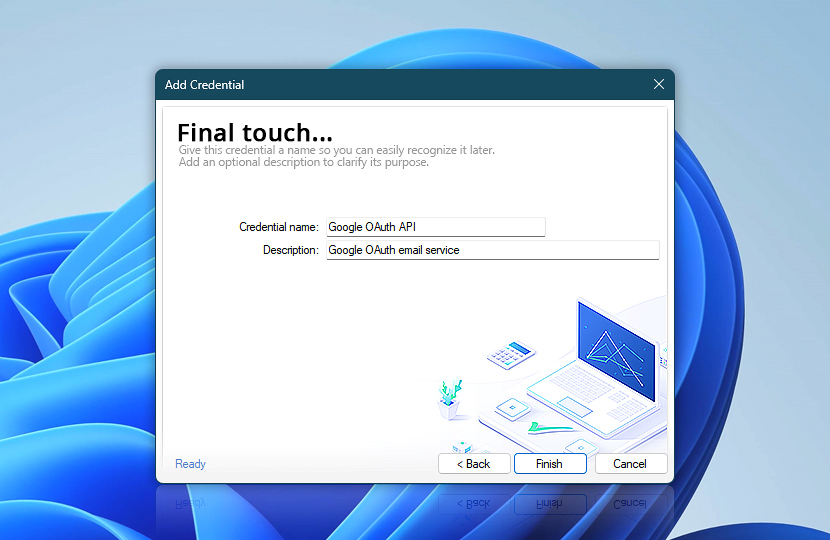
Complete
We are now at the final step of setting up the OAuth credential. You can enter a name and an optional description to help identify this credential later. This is especially useful if you plan to configure multiple email providers or projects in Automation Workshop.
Providing a descriptive name like Google OAuth API will make it easier to recognize which credentials are in use. After naming, click Finish to save everything.
You have now completed the setup of your Google OAuth 2.0 credentials in Automation Workshop. In the next step, we will move on to configuring the Send Email Action and sending your very first test message using the secure OAuth-based connection.
Configure email…
To begin, either create a new Task in Automation Workshop or open an existing one where you would like to include email functionality. Then, simply add the Send Email Action to your workflow from the list of available Actions.
Message setup
In the Email tab of the Send Email Action, enter the basic message details. Fill in the From and To fields with valid email addresses. You can also define the Subject and Email text body to customize your message content.
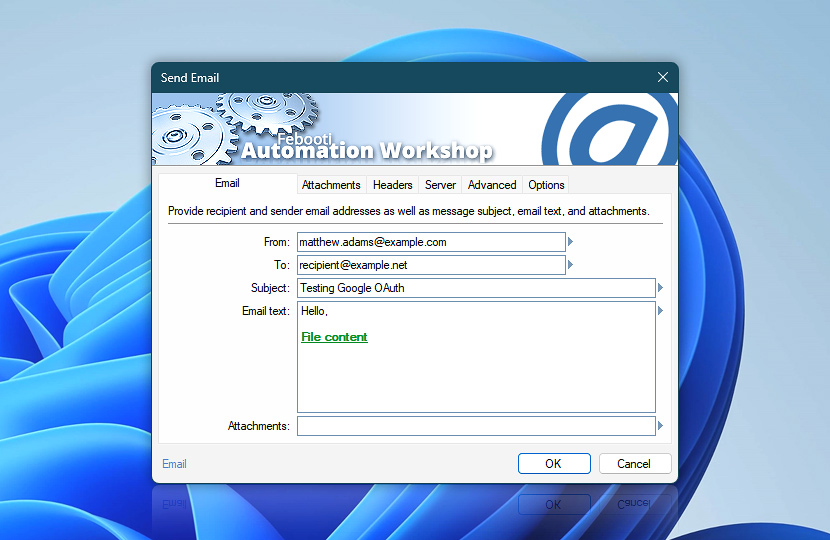
This example demonstrates a simple message setup for sending a test email.
SMTP & OAuth
In the Server tab of the Send Email Action, switch the server configuration to use a custom SMTP server or choose Gmail from the Wizard.
Choose smtp.gmail.com as the SMTP server and set the port to 587. Then select STARTTLS as the connection type.
For authentication, select OAuth2, and finally choose your previously created credential from the Use credentials dropdown.
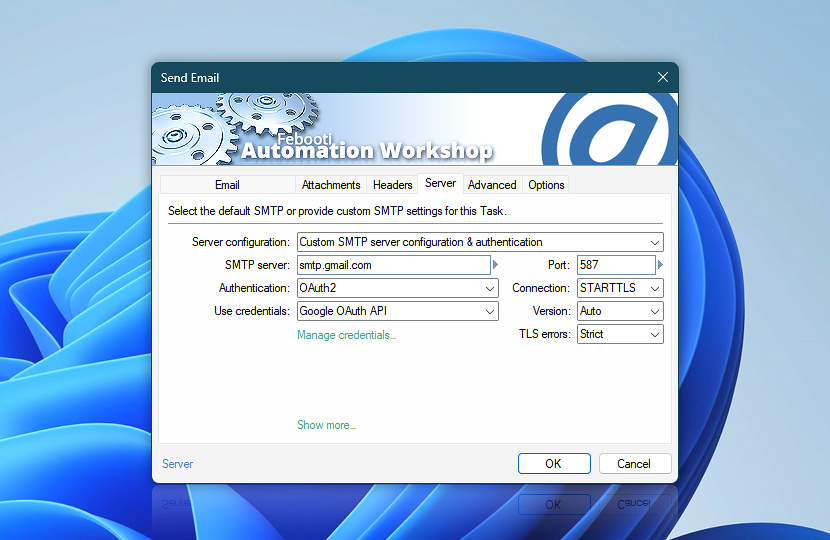
Once everything is set, Automation Workshop will use your Google OAuth credential to authenticate with Gmail's SMTP server. You are now just one step away from sending your first test email!
Done!
Click Run to execute your Task. The test email will be sent using your newly configured Google OAuth credentials. In just a moment, you should see the message in your email app or inbox. You can also check the Log Pane in Automation Workshop to verify that the email was sent successfully—it will display a confirmation entry for the Send Email Action.
Troubleshooting
If something does not work as expected, refer to the Log Pane, which will show all related errors and failure messages. Most issues include descriptive error messages, often with links or hints that point to the root cause—consult Google's documentation for more insights on these specific messages.
For more in-depth diagnostics, you can enable SMTP client/server communication logging in the Advanced tab of the Send Email Action. This will help you see exactly what happens under the hood.
Additionally, if you suspect network or firewall issues, check out our detailed Testing SMTP connection article. It guides you through pinpointing connectivity problems and understanding if your system is allowed to reach Google's mail servers.
Assistance is here…
If you have any questions, please do not hesitate to contact our support team.