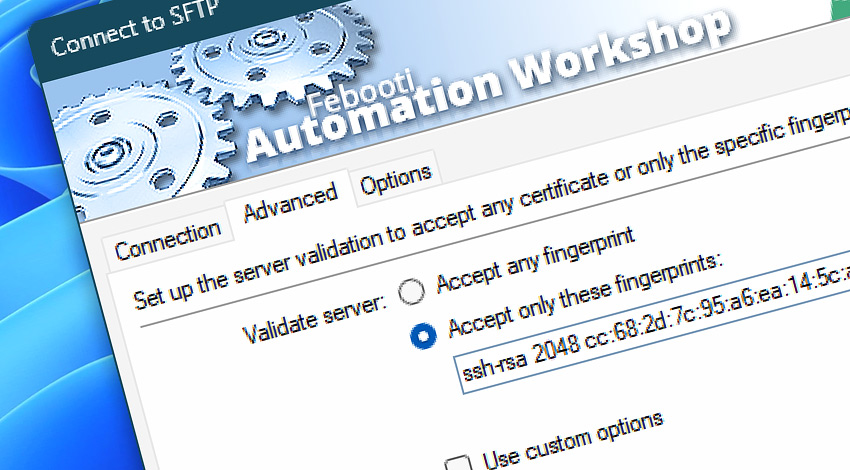
When Automation Workshop is connecting to a server with SFTP and SCP protocols, cryptographic RSA keys (or similar keys) are used. User can choose to accept either any public key or only the keys that match particular fingerprint (cryptographic checksum). Accepting only the keys with known checksums prevents the possibility of man-in-the-middle attack.
If user sets validate server option to accept any fingerprint, Automation Workshop accepts any key that a server returns.
If user chooses to accept only keys with particular fingerprints, these fingerprints have to be provided. User can specify multiple comma, semicolon or pipe-separated fingerprints. To seamlessly transition from an old server to a new server user can specify fingerprints of both old and new servers · Get FTPS or WebDAV fingerprints securely
MD5 fingerprint?
How to get a public key fingerprint? It is possible to find out the public key fingerprint by performing a few commands on the server. Many servers use 4 keys simultaneously, each made with different digital signature algorithm such as RSA, DSA, ECDSA, or ED25519.
Depending on preferred algorithm, user can choose which key file to take. In many cases RSA keys are used. To get a key in a format that can be used with Automation Workshop, user has to retrieve the SSH public key fingerprint and convert it.
RSA key
For RSA key run the following command and edit result:
sudo ssh-keygen -l -E MD5 -f /etc/ssh/ssh_host_rsa_key

2048 MD5:cc:68:2d:7c:95:a6:ea:14:5c:a0:14:fa:9a:5b:6e:26 root@ip-172-31-82-18 (RSA)
In the returned string remove MD5: from the beginning of the key and everything after the key. Add ssh-rsa in the beginning, so the final string looks like this:
ssh-rsa 2048 cc:68:2d:7c:95:a6:ea:14:5c:a0:14:fa:9a:5b:6e:26 DSA key
For DSA key run the following command and edit result:
sudo ssh-keygen -l -E MD5 -f /etc/ssh/ssh_host_dsa_key

1024 MD5:0e:a7:1d:88:36:7f:be:97:16:7a:7c:52:76:c5:ca:99 root@ip-172-31-82-18 (DSA)
In the returned string remove MD5: from the beginning of the key and everything after the key. Add ssh-dss in the beginning, so the final string looks like this:
ssh-dss 1024 0e:a7:1d:88:36:7f:be:97:16:7a:7c:52:76:c5:ca:99 ECDSA key
For ECDSA key run the following command and edit result:
sudo ssh-keygen -l -E MD5 -f /etc/ssh/ssh_host_ecdsa_key

256 MD5:84:49:6b:af:8a:cd:84:ea:ea:27:67:f3:67:52:fb:ae root@ip-172-31-82-18 (ECDSA)
In the returned string remove MD5: from the beginning of the key and everything after the key. Add ecdsa-sha2-nistp256 in the beginning, so the final string looks like this:
ecdsa-sha2-nistp256 256 84:49:6b:af:8a:cd:84:ea:ea:27:67:f3:67:52:fb:ae ED25519 key
For ED25519 key run the following command and edit result:
sudo ssh-keygen -l -E MD5 -f /etc/ssh/ssh_host_ed25519_key

256 MD5:43:4f:48:e8:7d:3b:a8:15:0a:c8:8d:0a:56:32:27:64 root@ip-172-31-82-18 (ED25519)
In the returned string remove MD5: from the beginning of the key and everything after the key. Add ssh-ed25519 in the beginning, so the final string looks like this:
ssh-ed25519 256 43:4f:48:e8:7d:3b:a8:15:0a:c8:8d:0a:56:32:27:64 SHA256 fingerprint?
Alternatively, user can choose a different hash algorithm by omitting the -E argument.
RSA key
For RSA key run the following command and edit result:
sudo ssh-keygen -l -f /etc/ssh/ssh_host_rsa_key

2048 SHA256:6c3k0RwFLVhK7rYa8yDGayedWafip37WOeTXGqP6cRA root@ip-172-31-82-18 (RSA)
In the returned string remove SHA256: from the beginning of the key and everything after the key. Put an = character at the end of the string and add a ssh-rsa prefix, so that the final string looks like this:
ssh-rsa 2048 6c3k0RwFLVhK7rYa8yDGayedWafip37WOeTXGqP6cRA= DSA key
For DSA key run the following command and edit result:
sudo ssh-keygen -l -f /etc/ssh/ssh_host_dsa_key

1024 SHA256:ATx6RcbwUwyE9Lrm4yAPX0G2sUo+CKsmA4pdyEhCt5A root@ip-172-31-82-18 (DSA)
In the returned string remove SHA256: from the beginning of the key and everything after the key. Put an = character at the end of the string and add a ssh-dss prefix, so that the final string looks like this:
ssh-dss 1024 ATx6RcbwUwyE9Lrm4yAPX0G2sUo+CKsmA4pdyEhCt5A= ECDSA key
For ECDSA key run the following command and edit result:
sudo ssh-keygen -l -f /etc/ssh/ssh_host_ecdsa_key

256 SHA256:yP/wF6NAzTSu69QvJkX/A2pGvzT4Vtc9gvj/iW9YjEU root@ip-172-31-82-18 (ECDSA)
In the returned string remove SHA256: from the beginning of the key and everything after the key. Put an equal = character at the end of the string and add a ecdsa-sha2 prefix, so that the final string looks like this:
ecdsa-sha2-nistp256 256 yP/wF6NAzTSu69QvJkX/A2pGvzT4Vtc9gvj/iW9YjEU= ED25519 key
For ED25519 key run the following command and edit result:
sudo ssh-keygen -l -f /etc/ssh/ssh_host_ed25519_key

256 SHA256:Xpuc85iZRODggOCuoZJo/A2OSIJ2P59W81AlwARBR1k root@ip-172-31-82-18 (ED25519)
In the returned string remove SHA256: from the beginning of the key and everything after the key. Put an = character at the end of the string and add a ssh-ed25519 prefix, so that the final string looks like this:
ssh-ed25519 256 Xpuc85iZRODggOCuoZJo/A2OSIJ2P59W81AlwARBR1k= Fingerprints & Windows
Choose the method that best suits your needs to view the SFTP server fingerprint on Windows. You can view an SFTP server's fingerprint in Windows using one of the following methods.
Please note, while obtaining a server's fingerprint remotely from Windows is easier, it is strongly recommended to acquire the fingerprints directly on the server where the SFTP server is installed. Acquiring a fingerprint from a Windows machine via the internet carries the risk that a third party could intercept your connection and alter the server's fingerprint. Therefore, remote obtaining should only be performed on trusted networks.
Automation Workshop
Using Automation Workshop to obtain a server's fingerprint is the recommended method because it consistently returns the fingerprint in the correct format. Such fingerprints can be directly copied and pasted into the server validation field. Other methods may require manual editing of the obtained fingerprints to ensure they are in the necessary format.
- Add a Connect to SFTP Action, filling in all the details of the SFTP server.
- Click Test Connection and observe the Log Pane for the server's fingerprint.
CMD + ssh-keyscan
- Open the Windows command prompt. In this example, we will use the ed25519 public-key signature system. Other systems accepted by ssh-keyscan include DSA, ECDSA, and RSA. Run the following command that uses the DNS name of a server:
ssh-keyscan -p 22 -t ed25519 server.example.com | ssh-keygen -l -E SHA256 -f - - Or, use the IP address of a server:
ssh-keyscan -p 22 -t ed25519 192.168.1.11 | ssh-keygen -l -E SHA256 -f - - Open PuTTY. Fill in the server host name under the Session category. Click on Open.
- If this is your first time connecting to this server, PuTTY will display a security alert showing the fingerprint.
- Open WinSCP and connect to your SFTP server.
- If you are connecting to the server for the first time, WinSCP will display a window showing the server's fingerprints.
- Once connected, you can open Server/Protocol Information from the Session menu to view the server's fingerprints.
- Open the FileZilla client, provide your SFTP server information in Site Manager, and connect to your SFTP server.
- Upon first connection, FileZilla will show a dialog box displaying the server's fingerprint.
- Additionally, you can view the SFTP server fingerprints even after you have already connected to a server. Simply click the Lock icon on the status bar, and this will display the Encryption Details window.
PuTTY
WinSCP
FileZilla
Which fingerprint to choose?
A fingerprint can be displayed in various ways, such as SHA-256 letter sequence or as MD5 hexadecimal colon-separated bytes. For example:
# SHA-256 letter sequence…
ssh-rsa 2048 6c3k0RwFLVhK7rYa8yDGayedWafip37WOeTXGqP6cRA=

# MD5 hexadecimal colon-separated sequence…
ssh-rsa 2048 cc:68:2d:7c:95:a6:ea:14:5c:a0:14:fa:9a:5b:6e:26
Server can use different cryptographic algorithms. For each encryption standard, the server can have a separate private key with its own fingerprint.
Actions & fingerprints
Actions & CA certificates
Automate Tasks now!

Assistance is here…
If you have any questions, please do not hesitate to contact our support team.
