
Automation Workshop allows you to create, view, and edit credentials for any service provider that supports the OAuth 2.0 standard. Whether you are working with email services, cloud platforms, or other APIs, the credential editor provides a structured and secure way to configure access.
The process is presented in a clear, wizard-style interface that guides you through each required step. From entering account information and client credentials to defining token endpoints and scopes, requesting interactive user consent (if required), and so on · OAuth overview
Manage credentials…
New credential
The first step in creating or editing an OAuth credential begins with entering the basic account information and selecting the authorization flow. These details are essential for establishing trust between Automation Workshop and the service provider you wish to connect with—whether it is Microsoft 365, Google Workspace, or another OAuth-compatible platform.
This screen collects the core values required for initiating the OAuth process, including the Client ID and Client Secret issued by the service provider. These values are obtained by registering your app in the provider's developer portal. You may also load this information automatically from a JSON file, which can be useful for Google Cloud credentials.
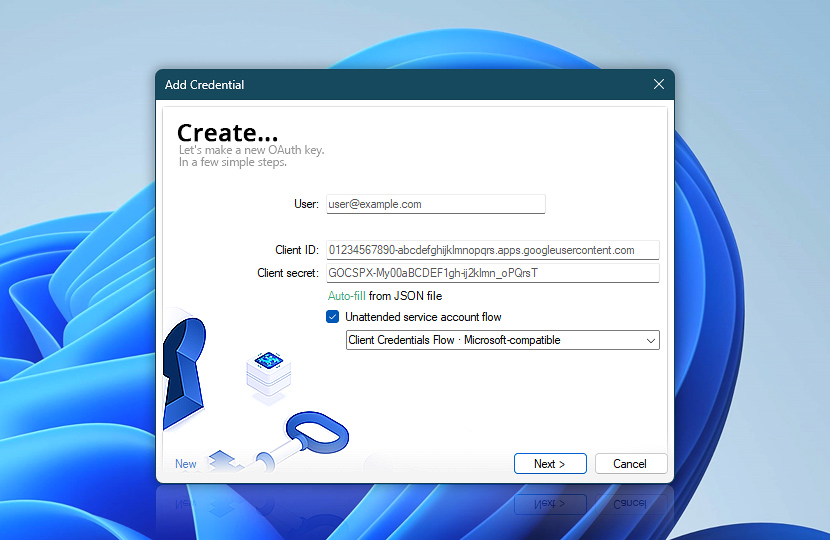
If your use case involves automated tasks that do not require end-user interaction, you can enable the Unattended service account flow. This flow, also known as a two-legged or client credentials flow, allows services to authenticate and operate securely without a manual sign-in step. The dropdown menu lets you choose a compatible configuration, such as Microsoft-compatible, based on the provider's specifications.
| Credential | Details |
|---|---|
| User | The user account name—usually written as an email address—that identifies a specific account holder (as opposed to aliases or shared addresses). When using service accounts (such as in Client Credentials Flow or Google JWT Flow), this field may optionally contain a specific user email address. If filled, that value will be used in the OAuth request. If left blank, the FROM address specified in the Send Email Action will be used in the OAuth request instead. This allows the service account to act on behalf of users within the same organization, depending on the provider's permissions. |
| Client ID | A unique identifier assigned to your application by the service provider when registering it for OAuth 2.0. It is used to identify the requesting application during authorization. |
| Client secret | A private value issued alongside the Client ID. It is used to authenticate your application with the service provider (especially when using a headless/unattended service flow). In some cases, such as Microsoft's user consent flow, this field may be left empty if not required by the provider. |
| Auto-fill from JSON file | Automatically populates the required fields (User, Client ID, Client Secret, endpoints, etc.) from a structured JSON file. Supported formats include standard .well-known configuration files and Google's Client Secrets format.You can review example JSON files for common providers: The JSON file is typically generated during the credential setup process in the provider's developer portal. For Google, this occurs during the Google OAuth credentials setup step. |
| Unattended service account flow | Enables non-interactive OAuth 2.0 authorization using a service account (headless mode), without requiring the user to manually sign in. This is ideal for background processes and system-to-system automation. Use the dropdown menu to select a compatible flow, such as Microsoft-compatible, based on your service provider's requirements. |
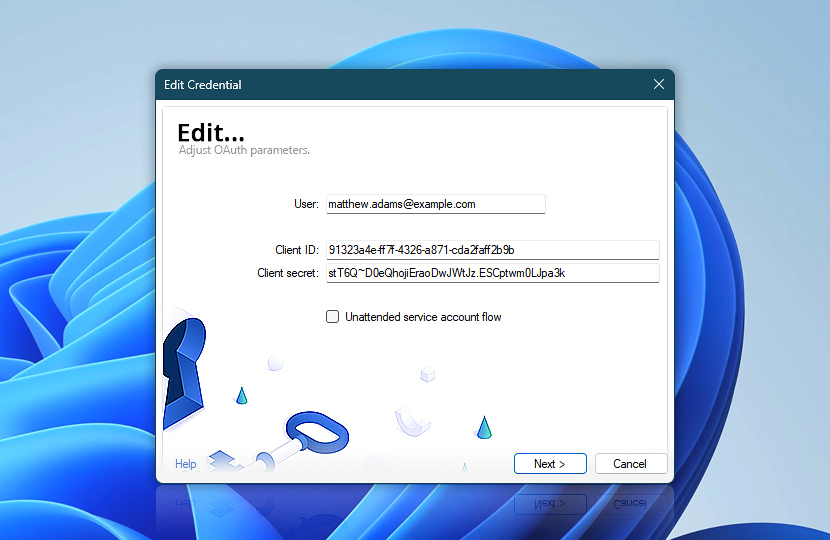
Edit credential
In addition to creating new credentials, Automation Workshop also allows you to view and modify existing ones. Whether you are rotating a client secret, adjusting the user field, or switching to a different authorization flow, the edit form ensures a seamless update process.
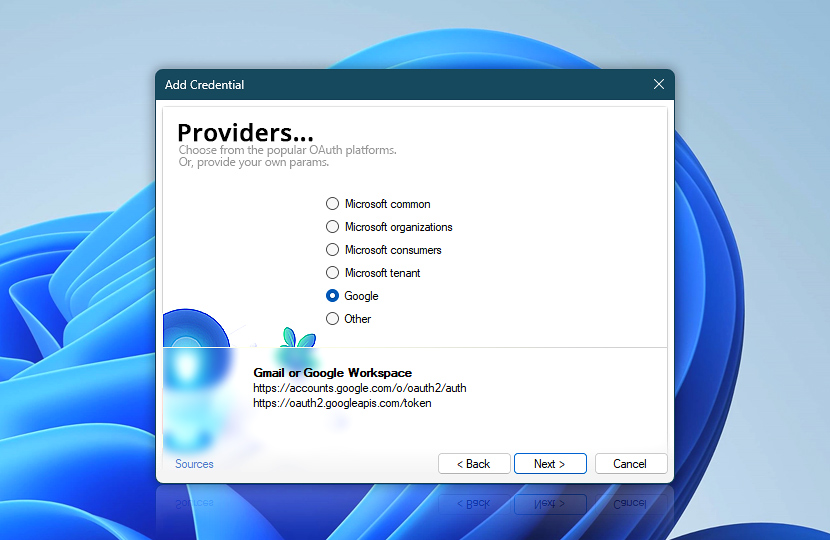
Providers
After entering your client credentials, the next step is to select the OAuth provider. This defines how Automation Workshop will communicate with the selected platform to request access tokens.
The Wizard provides several predefined options for commonly used services like Microsoft and Google. These options automatically fill in the necessary authorization and token endpoint URLs, as well as the scope field. If you are working with a different provider or need to supply custom parameters, the Other option lets you enter everything manually.
Microsoft
The Wizard offers several endpoint options for Microsoft 365, to support different account types and organizational structures. Each option automatically populates the appropriate authorization and token URLs for the Microsoft Identity Platform:
- Microsoft common · Use this if your credential needs to support both personal (Outlook.com) and work or school accounts across all Microsoft tenants. Ideal when your app is used by different user types or in multiple organizations.
- Microsoft organizations · Choose this when the credential should be limited to work or school accounts within Microsoft Entra (formerly Azure AD). Personal Microsoft accounts will not be able to authenticate.
- Microsoft consumers · Use this for personal Microsoft accounts only (e.g., Outlook.com, Hotmail). This excludes work or school accounts.
- Microsoft tenant · Select this if you want to restrict access to a single, specific tenant (organization). You will need to provide the tenant ID or domain name manually in the next step.
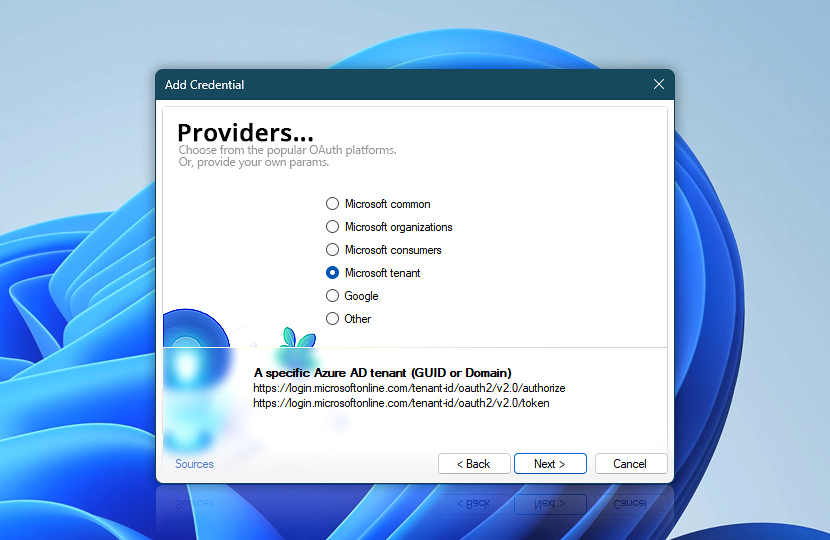
For Microsoft 365 accounts, especially those associated with paid business or enterprise subscriptions, the Microsoft tenant option is typically the most suitable choice. It allows you to target your organization's specific tenant by including its unique identifier or domain name in the OAuth URLs, ensuring secure and restricted access within your own Microsoft 365 environment.
When the Google option is selected, the system automatically configures the appropriate OAuth endpoints for Google services, including Gmail and Google Workspace accounts.
This option simplifies integration with Google's identity platform and is recommended for most use cases involving sending emails or accessing Google APIs. The predefined URLs support both individual Gmail users and domain-based Google Workspace accounts.
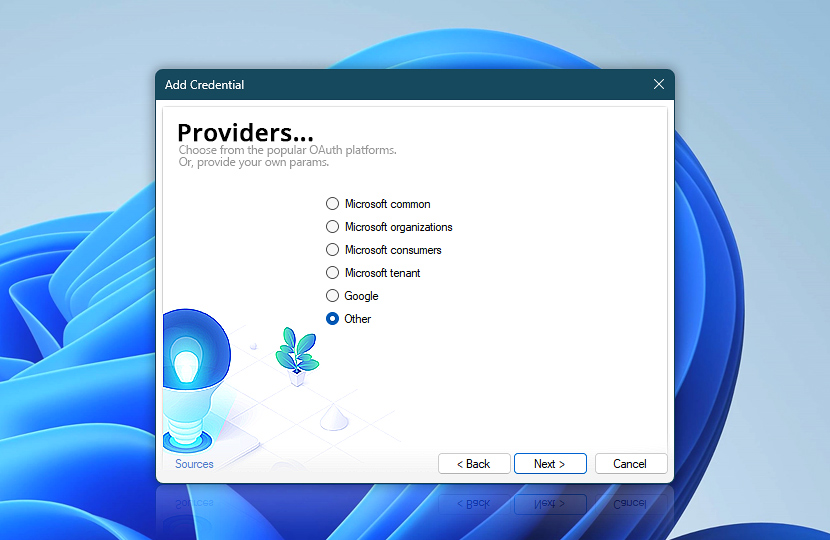
Other
Selecting the Other option gives you full manual control over the OAuth configuration. This option is intended for advanced setups or for service providers that are not listed among the predefined options.
Use this option when integrating with providers such as Yahoo, AOL, Yandex, Fastmail, Comcast, and many others. These providers typically support OAuth 2.0 but require you to manually enter the authorization and token endpoint URLs, as well as the required scope, in the next step.
While setup may take a bit more effort, it allows you to connect to virtually any standards-compliant OAuth 2.0 service by supplying the correct parameters.
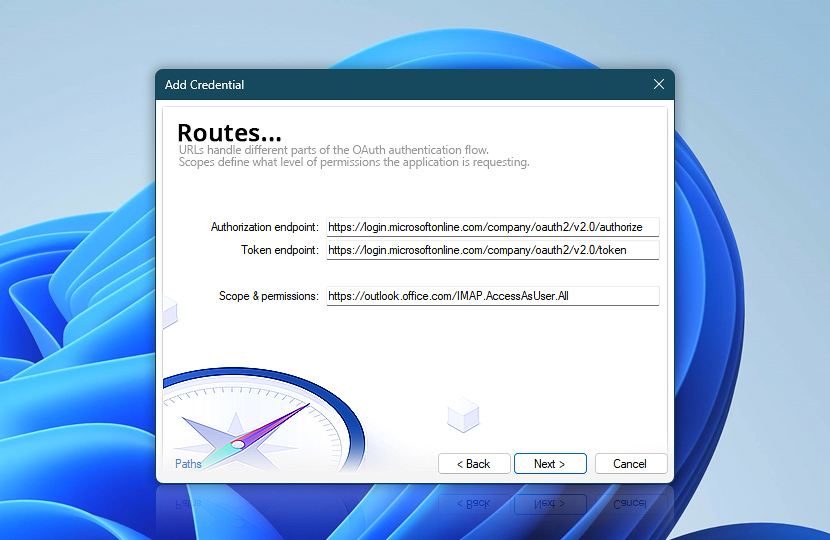
Routes
At this stage, you define the core technical parameters that drive the OAuth 2.0 flow—the authorization endpoint, token endpoint, and the scope of access being requested. These values are often filled in automatically based on your earlier provider selection. However, when using the Other provider option or a custom setup, you will need to supply these manually.
Each URL plays a specific role—authorization initiates the user consent process, token exchange finalizes access, and the scope—defines what permissions the application is requesting from the user or system.
Make sure the endpoint URLs match exactly what your service provider requires. Even small deviations can cause authorization to fail. Similarly, scopes must be precise and relevant to the access your automation needs—for example, sending email, reading calendar entries, or accessing mailbox data.
If you are unsure about the correct values, refer to the official documentation of your service provider. Most platforms offer sample configurations for common use cases like SMTP access via OAuth 2.0.
| Routes | Details |
|---|---|
| Authorization endpoint | The URL where the authorization process begins. This is typically where the user is redirected to sign in and grant consent to the application. It is required for interactive flows (such as user consent), but not needed in headless or unattended modes, where no manual sign-in occurs. The exact format depends on the chosen provider and, in some cases, your specific tenant or organization. |
| Token endpoint | The URL where the application exchanges credentials (such as an authorization code or client credentials) for an access token. This token is used to authenticate future API requests. The token endpoint must be valid for the selected provider and support the chosen OAuth 2.0 flow. |
| Scope & permissions | Defines what access the application is requesting from the service. Scopes are provider-specific and determine what actions the credential can perform—for example, sending emails, accessing mailbox data, or reading user profiles. Refer to your provider's documentation for the exact scope required to send emails via SMTP. Supplying the correct scope is essential, as missing or incorrect values may result in the inability to send emails. |
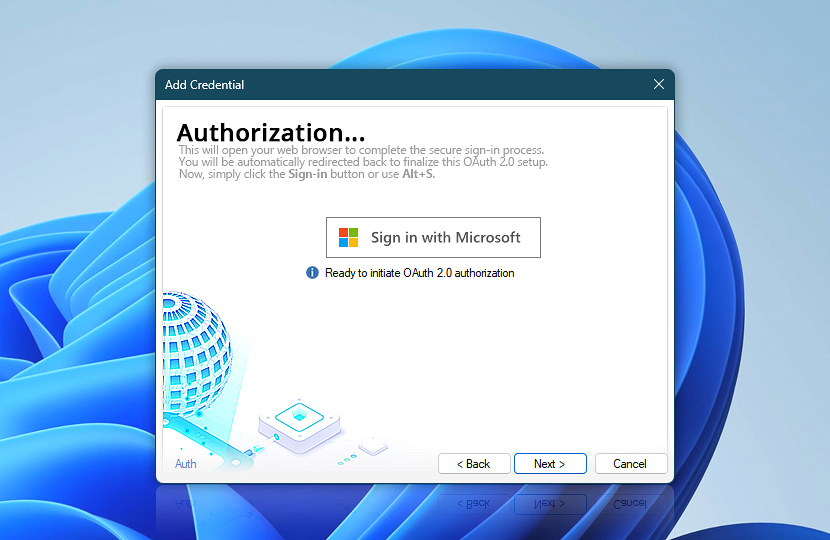
Authorization
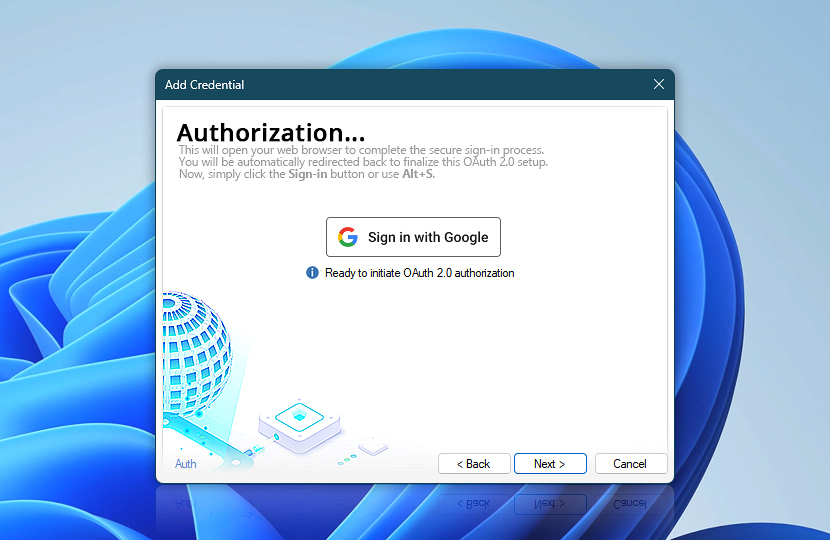
In this step, the credential setup process initiates the OAuth 2.0 authorization flow. For flows that require user consent, clicking the Sign in button will open your default web browser, where you will be prompted to sign in to the selected provider's platform. This may include multi-factor authentication and a consent screen requesting permission to grant access to the specified scopes.
Once consent is granted, you will be automatically redirected back to Automation Workshop, where the authorization result is processed. If successful, access and refresh tokens are issued and stored securely.
For unattended flows (headless mode), no browser interaction is needed. Consent is pre-configured in the provider's console—such as in Google Cloud Console or Microsoft Entra—where permissions are granted to the service or app in advance.
Sign in with Microsoft
When using Microsoft 365 or related Microsoft Identity services, the Sign in with Microsoft button opens the Microsoft sign-in page, where you authenticate and grant access as required. Depending on your configuration (e.g., tenant-restricted or multi-tenant app), you may see an organization-specific consent prompt. Once permission is granted, you will be redirected back to Automation Workshop, where a confirmation will indicate a successful authorization.
Sign in with Google
For Gmail or Google Workspace accounts, clicking the Sign in with Google button starts the standard Google OAuth 2.0 flow. You will be asked to log in (if not already signed in) and to confirm access for the requested scopes. Upon successful completion, the app will return to Automation Workshop and display a success status, confirming the credential is now active.
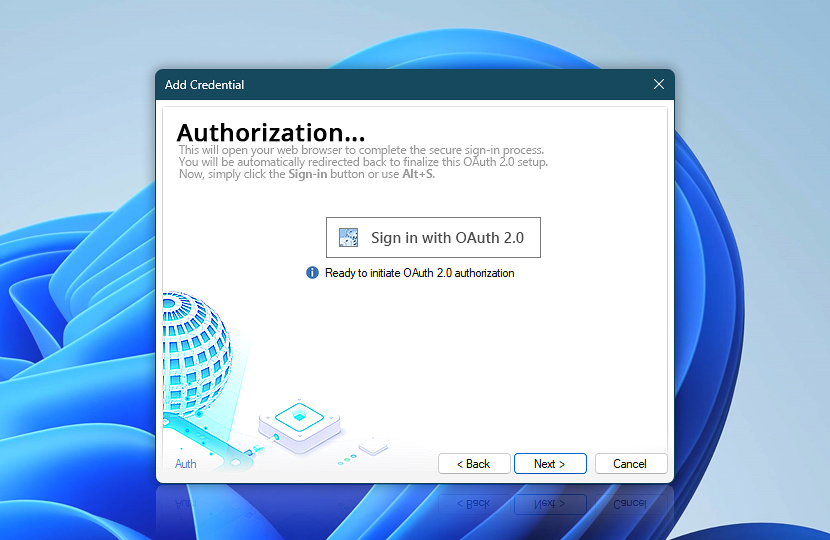
Sign in with OAuth 2.0
When working with custom or lesser-known OAuth providers, the Sign in with OAuth 2.0 button functions similarly. It initiates the authorization flow using the custom endpoints and scopes you configured in previous steps. After successful sign-in and consent, you will be returned to Automation Workshop with a confirmation message, signaling that authorization was successful.
Success!
Once the authorization is completed, Automation Workshop displays a confirmation along with the issued access token and refresh token. This is your assurance that the credential has been validated and is now ready for use in tasks such as sending email or accessing external services.
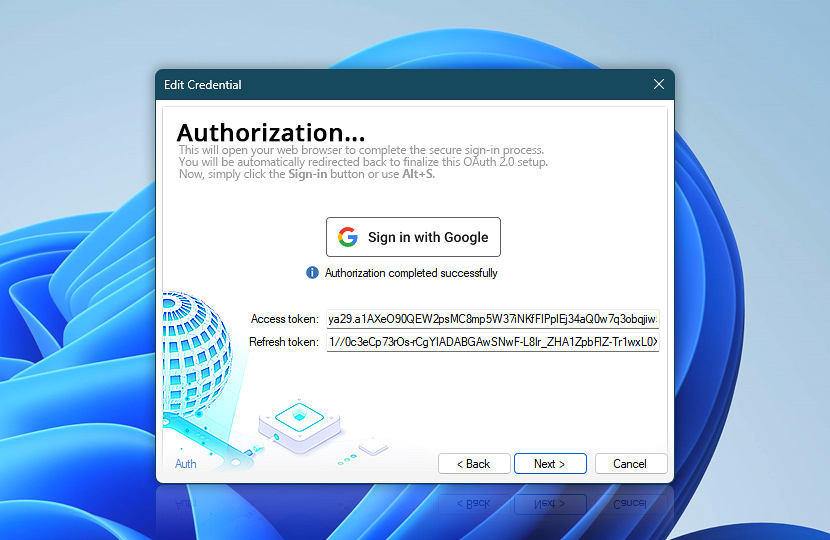
After a successful sign-in and authorization, Automation Workshop displays the issued access token and refresh token.
| Tokens | Details |
|---|---|
| Access token | A temporary credential used to authorize specific API requests, such as sending email or accessing mailbox data. It is issued by the provider and typically expires after a short period (e.g., one hour). Automation Workshop automatically includes this token when performing authorized actions. |
| Refresh token | A long-lived credential used to request a new access token when the current one expires. This ensures continuous access without requiring the user to sign in again. The refresh token is securely stored and used behind the scenes to keep the credential valid. |
OAuth failed?
If the authorization process fails, no tokens will be issued, and the credential will remain inactive. Automation Workshop will display an error message directly below the Sign in button, providing insight into what went wrong.
In some cases, the error may appear in your web browser during the sign-in process—especially if the flow is interrupted, the user cancels the consent, or the app is not properly configured on the provider's side. Common causes of failed authorization include:
- Invalid or missing client credentials · If the Client ID or Client Secret is incorrect, the provider will reject the request.
- Mismatched redirect URI · The redirect URI in your OAuth configuration must exactly match what is registered in the provider's developer console.
- Incorrect or missing scopes · If required scopes are not specified or are not allowed for the given app, authorization may be denied.
- Consent not granted · If the user closes the browser window or declines the requested permissions, the process will not complete.
- Tenant restrictions · When using Microsoft Entra, tenant access policies may block the authorization if the app is not allowed in the directory.
- Unverified app or restricted account · Some providers (like Google) may block unverified apps or accounts with restricted access.
To resolve these issues, double-check your app registration settings, scope values, and ensure that all URLs and permissions match what is required by your provider.
Alternatively, you can borrow the required OAuth configuration from well-known open source applications.
Final touch
The final step of the credential creation process is to assign a name and optionally add a description. This does not affect the behavior of the credential but makes it easier to identify and manage in the list of stored credentials—especially if you are using multiple keys across different services or environments.
Choose a name that reflects the credential's purpose or scope of use, such as a specific application, department, or Task. A clear description can further clarify its role for you or your teammates.
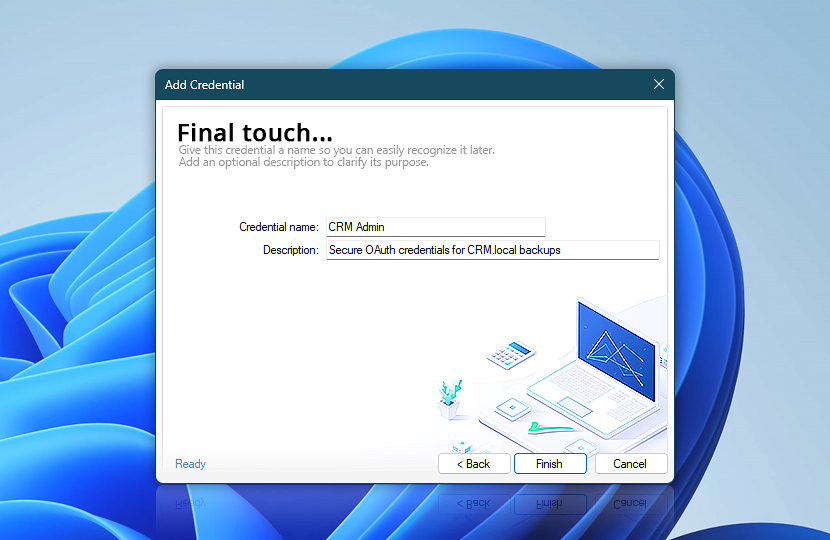
Once everything is filled in, click Finish to save the credential. It will now appear along with your existing OAuth 2.0 credentials, ready to be used in actions like Send Email or defined as a default method in global settings. You can edit the name and description later if needed—without affecting the credential's functionality.
This completes the setup process and the credential is now ready for secure and automated email sending.
Need assistance?
If you have any questions, please do not hesitate to contact our support team.